Getting Started
Learn how to set up and use CooplyHQ for your homeschool co-op
- Create a CooplyHQ Account
- Account Basics — Dashboard and Settings
- Creating an Event
- Inviting Families to Your Co-op
- Managing Your Co-op Calendar
- Setting Up Stripe Payments: How Onboarding Works and How Fees Are Handled
- How to Set Up Membership Plans and Recurring Payments
- How to Send Newsletters and Announcements to Your Co-op
- How to Manage Registrations and Track Attendance
- How to Create an Event and Enable Member Registration
- How to Create an Event and Enable Member Registration
- How to Manage Your Co-op Calendar
- How to Invite Families and Manage Your Member Directory
- How to Configure Your Co-op Settings
- How to View and Manage Membership Payments
- How to Review and Approve Membership Signups
- How to Grant Website Editor Access (Content Editor Role)
- How to Grant Website Editor Access (Content Editor Role)
- How to Grant Website Editor Access (Content Editor Role)
- How to Grant Website Editor Access (Content Editor Role)
- How to Export Co-op Finances (QuickBooks-compatible files)
- How Members Control Their Directory Privacy Settings
- How to Manage Standing Volunteer Roles
- What to Do If You Can't Sign In
- How to Add Your Co-op's Logo and Branding
- How to Choose a Site Template and Customize Your Theme
- Website Editor: Editing Content & Publishing
- Website Editor: Creating & Organizing Pages
Create a CooplyHQ Account
Get your homeschool co-op online in minutes by creating a CooplyHQ account.
Steps
-
Go to cooplyhq.com and click Get Started in the top navigation or hero section.

-
Enter your email address and create a secure password.
-
Agree to the Terms of Service and confirm your email address by clicking the link sent to your inbox.
-
You're now logged in to your CooplyHQ dashboard, with a setup checklist to walk you through getting your co-op ready to go live.

What's next
Read Account Basics to navigate your dashboard and update your profile settings.
Account Basics — Dashboard and Settings
Once you're logged in, you'll spend most of your time in the dashboard. Here's what you need to know to get started.
Your Dashboard
The dashboard is your home base for managing your co-op. From here, you can create events, manage members, and track schedules.
Manage Your Account Settings
To update your profile information or change your password:
-
From the dashboard, click your profile icon or name in the top-right corner.
-
Select "Account Settings" from the dropdown menu.

-
Update your email address, name, or password as needed.
-
Click "Save Changes" to confirm.
What's next
Read Creating an Event to set up your first co-op gathering.
Creating an Event
Events are how you schedule co-op meetings, classes, and gatherings. Here's how to create one.
Steps
-
From your dashboard, click the "Create Event" button or navigate to the Events section.
-
Click "New Event" to start.

-
Fill in the event details:
- Event Title: Give your event a clear name (e.g., "Science Class," "Monthly Meetup")
- Date and Time: Select when the event takes place
- Location: Add the address or link where the event will happen
- Description: Add details about what to bring, what to prepare, or any instructions for families
-
Set recurring options if this event happens regularly (weekly, monthly, etc.).
-
Add families or members who should be invited to this event.
-
Click "Create Event" to save.
Your co-op members will now see this event in their calendars and can RSVP.
What's next
Start inviting your co-op families and creating a shared schedule. For help managing members or invitations, check the Account Basics article.
Inviting Families to Your Co-op
Once your co-op is set up, you'll need to invite families so they can see the calendar and RSVP to events.
Steps
-
From your dashboard, go to the Members section.

-
Click "Invite Family" or "Add Member" to start sending invitations.
-
Enter the email addresses of family members you want to invite to your co-op.
-
Optionally add a message explaining the co-op and what to expect.
-
Click "Send Invitations" to send email invites to the families.
What families see
Families will receive an email with a link to join your co-op. When they click the link, they'll create a CooplyHQ account and be added to your co-op automatically. They'll then see all upcoming events and can RSVP.
Managing members
From the Members page, you can:
- View all families in your co-op
- Remove families who are no longer participating
- See who has accepted the invitation and who hasn't yet
What's next
Once families are invited, see Creating an Event to schedule your first gathering.
Managing Your Co-op Calendar
Your calendar is where families see all upcoming events, RSVPs, and schedules for the co-op.
View Your Calendar
From your dashboard, go to the Events section to see all your co-op events.

Here you can:
- See upcoming events at a glance
- View event details by clicking on any event
- See who has RSVP'd to each event
- Manage attendance and scheduling
Edit or Cancel Events
-
Click on any event in your calendar.
-
Select "Edit" to change the date, time, location, or description.
-
To cancel an event, select "Delete" and confirm. Families will be notified of the cancellation.
Recurring Events
When you create an event with a recurring schedule (like weekly classes), CooplyHQ automatically creates each instance. You can edit individual events or the entire series.
Share Your Calendar
Families can view the entire co-op calendar once they join. They'll see all upcoming events and can RSVP to the ones that apply to them.
What's next
Once your calendar is set up with events, see Inviting Families to Your Co-op to start building your community.
Setting Up Stripe Payments: How Onboarding Works and How Fees Are Handled
CooplyHQ uses Stripe Express to process payments from families. Before you click Start Stripe Onboarding, here is exactly what to expect — so there are no surprises partway through.
To begin: go to Admin → Payouts & Billing → Stripe Connect in your co-op admin panel.
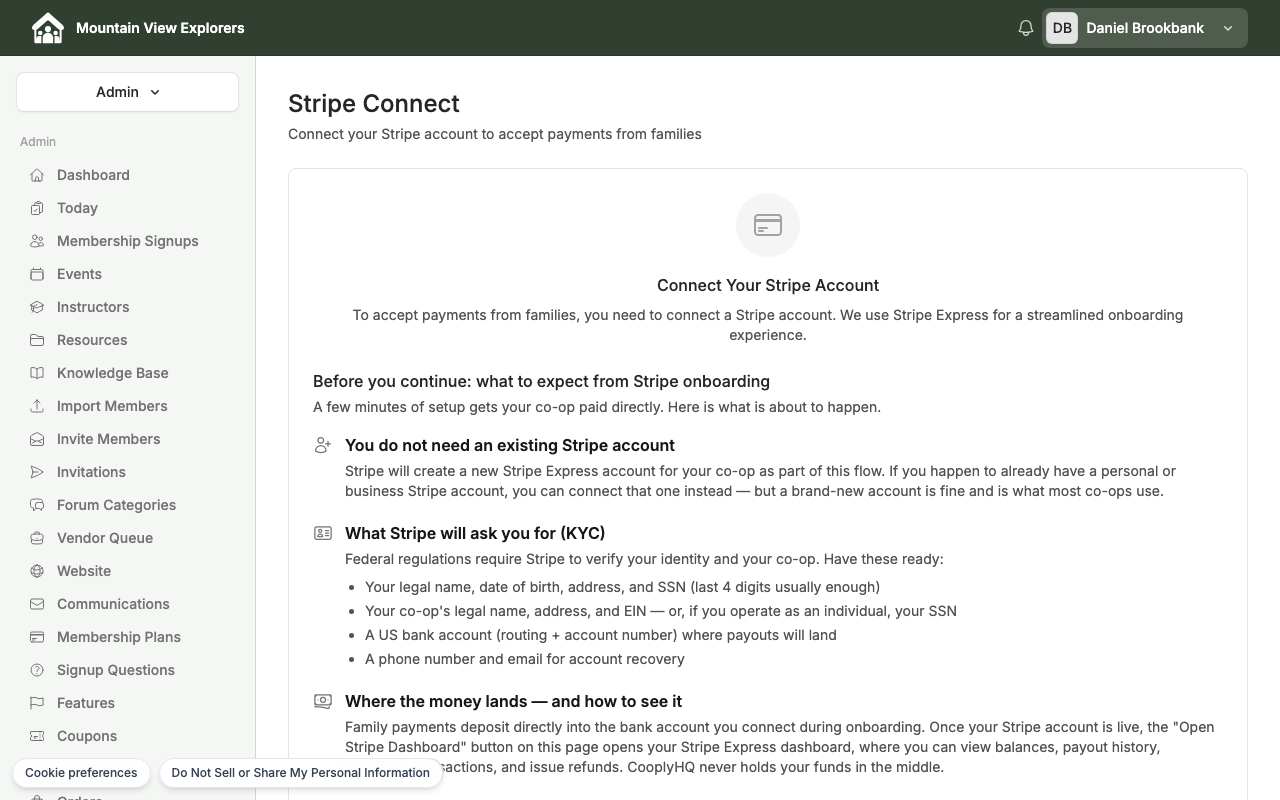
You do not need an existing Stripe account
Stripe will create a new Stripe Express account for your co-op as part of this flow. If you already have a personal or business Stripe account, you can connect that one instead — but a brand-new account is fine and is what most co-ops use.
What Stripe will ask you for (KYC)
Federal regulations require Stripe to verify your identity and your co-op. Have these ready before you start:
- Your legal name, date of birth, address, and SSN (last 4 digits usually enough)
- Your co-op's legal name, address, and EIN — or, if you operate as an individual, your SSN
- A US bank account (routing + account number) where payouts will land
- A phone number and email for account recovery
Stripe's onboarding form walks you through each step. Most co-op admins complete it in about 10 minutes. Your information goes directly to Stripe — CooplyHQ never sees or stores it.
Where the money lands — and how to see it
Family payments deposit directly into the bank account you connect during onboarding. CooplyHQ never holds your funds in the middle.
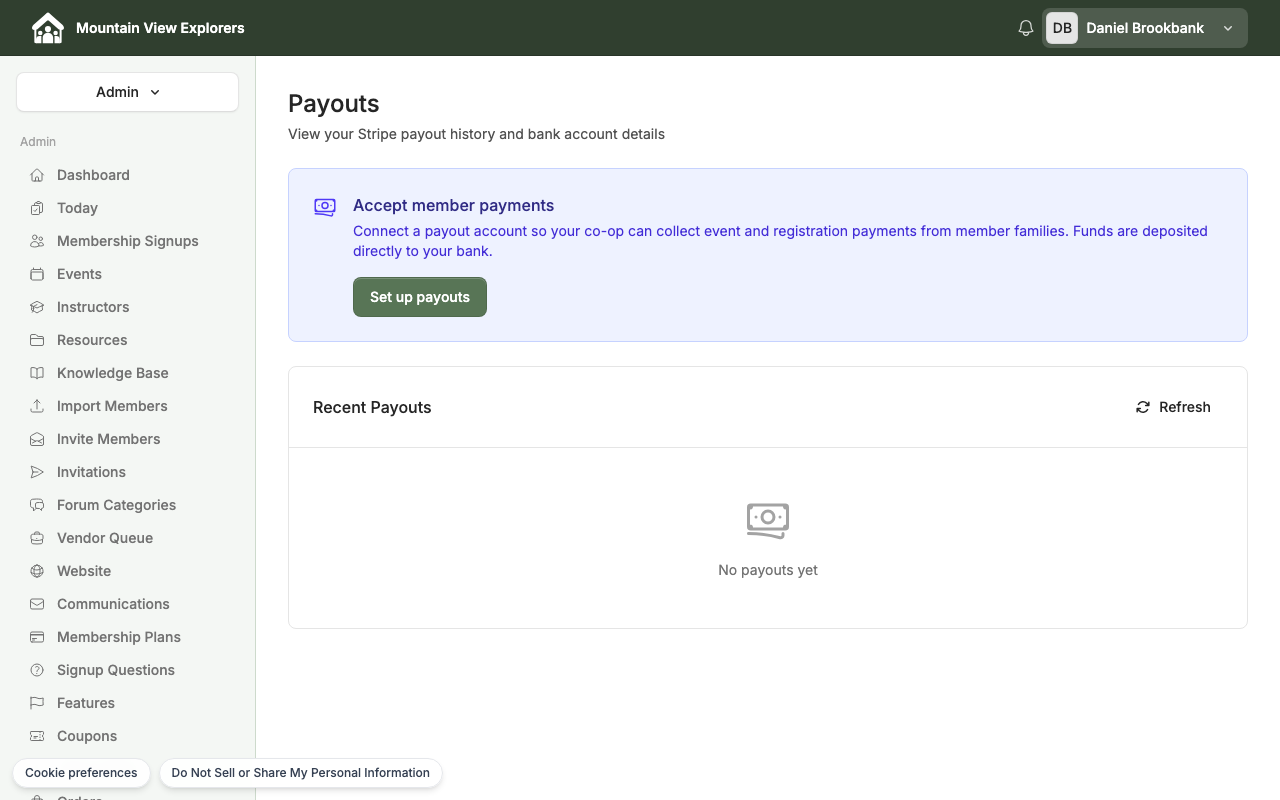
Once your Stripe account is live, the Open Stripe Dashboard button on the Stripe Connect page opens your Stripe Express dashboard, where you can view balances, payout history, individual transactions, and issue refunds.
How Stripe fees are handled
Stripe charges a processing fee on each card payment (typically 2.9% + 30¢). CooplyHQ gives you control over how those fees are handled. You set the mode per priced item — membership plans, events, classes, and classified listings each have their own setting.
Two modes are available:
Absorb (default)
Your co-op pays the Stripe processing fee. Families pay the sticker price exactly. If you list a class at $50, the family pays $50 and your co-op receives the remainder after Stripe's fee.
Choose Absorb when you want the simplest checkout experience for families and are comfortable building the fee into your pricing.
Gross-up
One all-in price for families, with the Stripe fee baked into the displayed amount. The buyer effectively pays the fee.
Example: If you want to net $50, CooplyHQ calculates the grossed-up price (approximately $52.06) so that after the Stripe fee is deducted, you receive exactly $50.
Choose Gross-up when you want your co-op to net a specific amount on every transaction.
Why checkout happens on checkout.stripe.com
When a family clicks to pay, they are redirected to checkout.stripe.com — Stripe's PCI-compliant hosted checkout page — to enter card or bank details, then returned to your co-op site.
Card numbers never touch CooplyHQ's servers. This keeps your co-op completely out of PCI compliance scope — a significant benefit that removes a large category of data security requirements from your organization.
Ready to connect?
Go to Admin → Payouts & Billing → Stripe Connect and click Start Stripe Onboarding. The guided Stripe flow takes a few minutes. Once complete, your co-op can immediately start collecting payments from families.
How to Set Up Membership Plans and Recurring Payments
Overview
Membership Plans let you define the tiers families choose from when joining your co-op. Each plan can have a name, a description, feature bullets, and an optional member limit. Once you save a plan it becomes active immediately and appears on your co-op's public membership page.
Separately, the Membership Payment page controls whether — and how much — your co-op charges at signup. A plan price and the membership payment settings work together: see Step 1 before you create your first plan.
Before you start: Your Stripe account must be connected under Payouts & Billing before you can collect any payment — a flat membership fee, a paid plan price, or both. Free plans with no fee do not require Stripe. See Setting Up Stripe Payments for setup instructions.
Step 1: Set Up How You Collect Payment
- Sign in to your co-op admin panel.
- In the left sidebar, click Membership Payment (listed just below Membership Plans).

Configure three settings:
| Setting | What it does |
|---|---|
| Collect membership payment at signup | On (default): a family is sent to checkout before their application completes. Off: applications are accepted without payment. |
| Membership dues | A flat, one-time fee (in dollars) charged when a family joins without picking a priced plan. If a plan has its own price, the plan's price is charged instead of this fee. |
| Finish the application automatically when a family pays | Off (default): a paid application still waits in the Paid — Pending queue for manual approval, even though payment already cleared. On: a paid application is approved the instant payment clears. |
If you leave the membership dues field blank and every plan is either free or has no price of its own, the page shows a warning — "No family can be charged yet" — because nothing is configured to charge. Set a membership dues amount here, a priced plan in Step 4, or both before you publish your enrollment page.
Step 2: Open Membership Plans
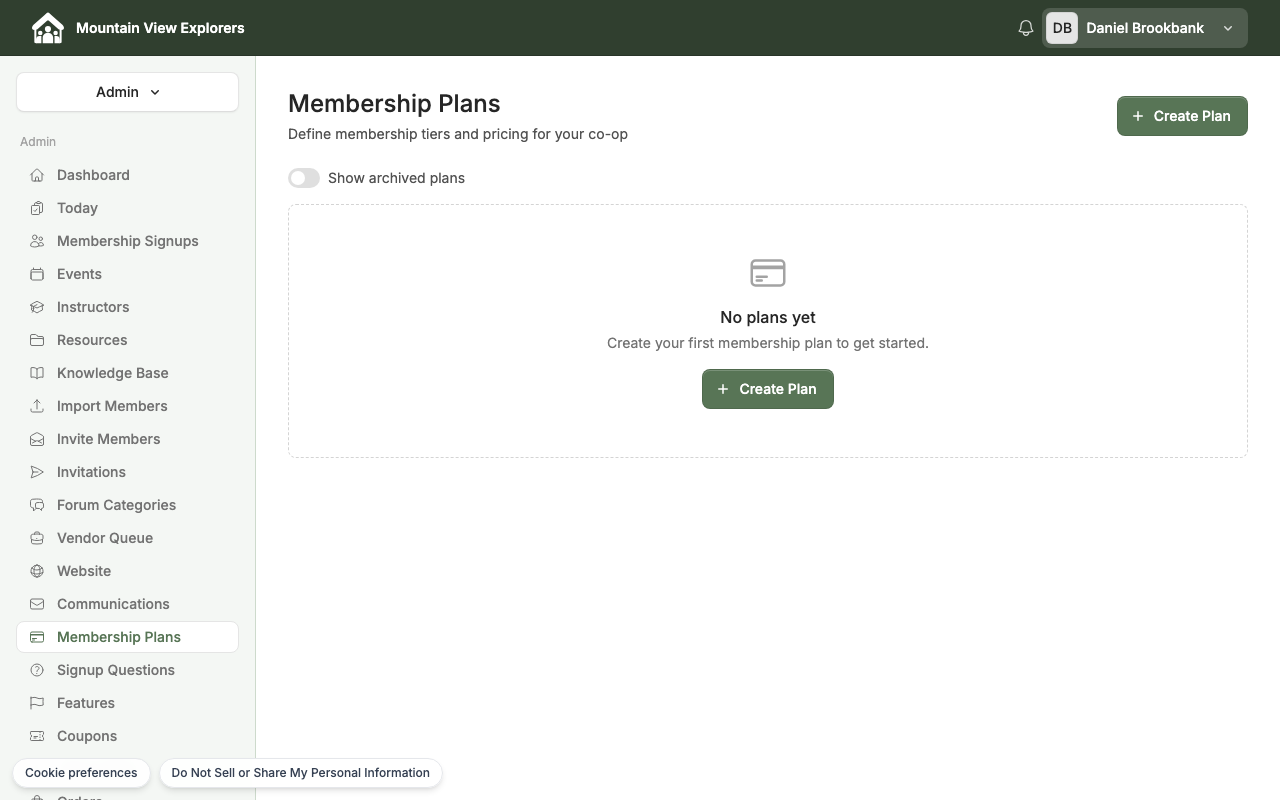
The page shows all your active plans. If you have not created any yet, it shows "No plans yet" with a Create Plan button.
Step 3: Create a Plan
- Click + Create Plan (top-right) or the Create Plan button in the empty-state card.
The Create Plan modal opens.
- Fill in the plan details:
| Field | What to enter |
|---|---|
| Plan Name | Short, recognizable name (e.g., "Basic", "Family", "Premium") |
| Description (optional) | One or two sentences describing what the plan includes |
| Features (optional) | Bullet points shown to families on the enrollment page — click + Add Feature to add more |
| Member Limit (optional) | Maximum number of members allowed on this plan. Leave blank for unlimited. |
Step 4: Set Pricing and Billing Intervals
Free plan
Toggle on Free Tier if families join at no cost through this plan. No Stripe connection is required for free plans. Skip to Step 5.
If you want a free-tier plan but still collect a flat charge, leave the plan's price unset and use the Membership dues fee from Step 1 instead — that fee applies whenever a family joins without a priced plan.
Paid plan
Leave Free Tier off. Under Billing Periods, enable one or more intervals:
- Monthly — families are billed every month
- Semester (6 months) — families are billed twice a year
- Annual — families are billed once a year
For each enabled interval, enter the price in dollars.
Processing-Fee Handling — choose how Stripe's processing fee is covered:
| Option | What happens |
|---|---|
| Absorb (default) | Your co-op pays the processing fee. Families are charged exactly the listed price. |
| Gross-up | The processing fee is added into the displayed price. Families see one all-in amount. |
You can mix intervals and fee modes — for example, offer both Monthly and Annual with different fee settings on each.
Coming soon: Checkout for a plan priced with a Monthly, Semester, or Annual billing interval isn't available yet — a family who selects one of these plans today hits a payment error instead of completing checkout. You can configure billing intervals now so they're ready when this ships, but until then, collect dues through the flat Membership dues fee (Step 1) paired with a Free Tier plan.
Step 5: Save the Plan
Click Create Plan. The plan saves and is immediately Active — no separate publish step is needed.
To edit a plan later, return to Membership Plans and click Edit on any plan card.
Step 6: How Families See and Enroll
Once at least one plan is active, families can visit your co-op's public membership page at:
https://yourco-op.cooplyhq.com/membership/plans
The page lists all active plans. If you offer multiple billing intervals (e.g., Monthly and Annual), a toggle at the top lets families switch between intervals to compare prices.
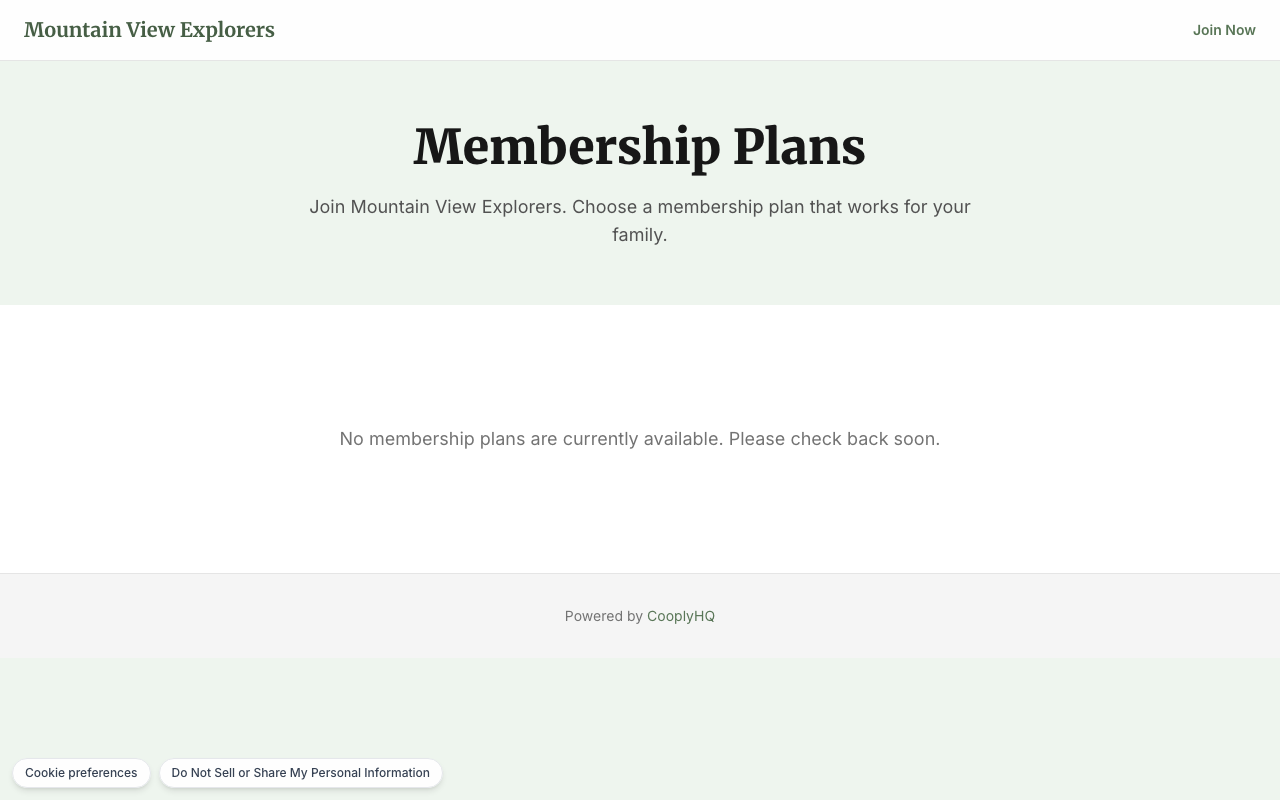
Families click Join Now to begin a three-step application:
- Contact Info — primary contact name, email, and phone number
- Household — children and household details
- Membership — plan selection, then payment (if anything is owed)
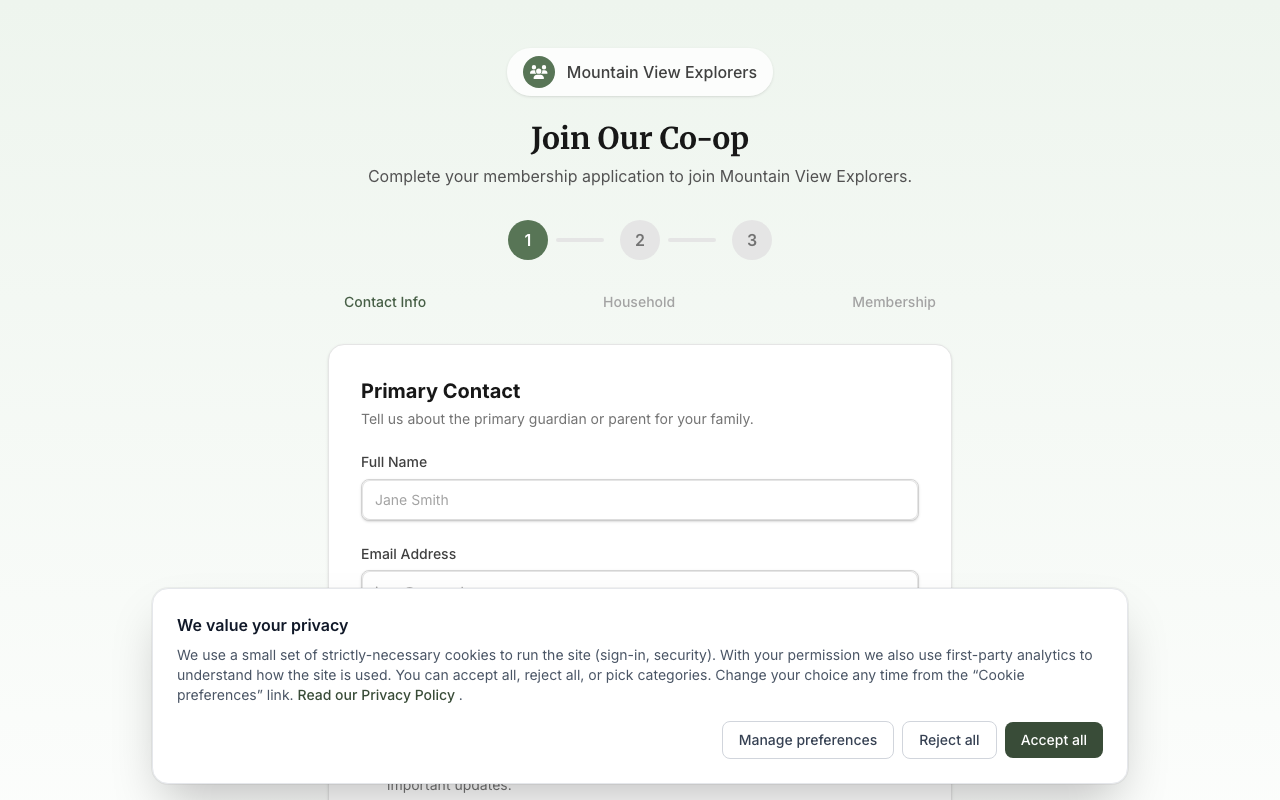
After completing the form, families are taken to Stripe Checkout to pay any membership dues or plan price that applies, or directly to a confirmation page if nothing is owed. As noted in Step 4, checkout for a billing-interval-priced plan isn't available yet — keep your enrollment page limited to Free Tier plans plus the flat membership dues fee until that ships.
Step 7: View Membership Signups
To see who has applied or enrolled:

The Membership Signups page shows all applications with status tabs:
| Tab | Meaning |
|---|---|
| All | Every application, regardless of status |
| Completed | Enrollment is finished and payment (if required) has been received |
| Submitted | Family submitted the application. This tab is based on status, not payment — a free or already-settled signup can land here too. |
| Paid — Pending | Payment received; awaiting admin approval (when "Finish the application automatically when a family pays" is off in Step 1) |
| On Hold | Admin has placed the application on hold for review |
| Rejected | Application was not approved |
| Draft | Family started but did not submit the application |
| Voided | An admin voided the application; it's no longer active |
| Abandoned | Family started and did not complete within the session |
Click any row to view the full application details and take action.
What's Next
- Signup Questions — Add custom questions to the enrollment form: in the sidebar go to Signup Questions.
- Coupons — Create discount codes for your plans: in the sidebar go to Coupons.
- Payouts & Billing — View Stripe payouts and check your balance: in the sidebar go to Payouts & Billing.
How to Send Newsletters and Announcements to Your Co-op
Overview
CooplyHQ's Bulk Email tool lets you send newsletters and announcements to every family in your co-op (or a specific group) in just a few steps. You can write a custom message or use a saved template, add an optional SMS notification, preview the email before it goes out, and send immediately or schedule for a future date and time.
Step 1: Open the Bulk Email Tool
- Sign in to your co-op admin panel.
- In the left sidebar, click Communications.
- On the Email Templates page, click Send Bulk Email in the upper-right corner.

Step 2: Choose Your Recipients
Under Recipients, select who should receive the email:
| Option | Who receives it |
|---|---|
| All families (all guardians) | Every guardian in your co-op |
| Active members only | Families with an active membership period |
| Users with specific role | Admins, staff, guardians, or members only |
| Individual families | Specific households you pick from a list |
The Summary panel on the right updates instantly to show how many recipients match your selection.

Step 3: Write Your Message
Under Email Content, choose how to compose your email:
Option A — Use a saved template
- Select Use template.
- Choose a template from the drop-down. A subject and body preview appear automatically.
Option B — Write a custom message
- Select Custom message.
- Enter a Subject.
- Write the email body using Markdown.
You can personalize any message with these placeholders — CooplyHQ replaces them with real values for each recipient:
{{name}}— recipient's name{{email}}— recipient's email address{{tenant_name}}— your co-op's name

Step 4: Preview and Test
Before sending, verify the email looks right:
- Click Preview Email to see a rendered preview of the message, with placeholders filled in as an example.
- Click Send Test to Me to receive the email at your own address and check formatting in a real inbox.

Step 5: Choose When to Send (and Add SMS)
Under Schedule, pick a delivery time:
- Send immediately — the email goes out as soon as you confirm.
- Schedule for later — choose a future date and time. CooplyHQ queues the email and sends it automatically at the scheduled time.
Below the timing options, you can also check Also send SMS to opted-in members. When checked, recipients with a verified phone number and SMS notifications enabled will receive an SMS containing the email subject in addition to the email itself. SMS messages are limited to 320 characters — if your subject line is longer, CooplyHQ automatically truncates it to fit.

Step 6: Confirm and Send
- Review the Summary panel — confirm the recipient count, content, and timing.
- Click Send to [N] recipients (or Schedule Email if you picked a future time).
- A confirmation dialog appears, warning that the action can't be undone. If you checked the SMS option, the dialog also notes that an SMS will be dispatched to opted-in recipients. Review the details and click Send Email (or Schedule Email) to confirm.

Once sent (or scheduled), a green success message confirms the action. You can click View History to see delivery status.
Step 7: View Send History and Status
To review past campaigns:
- Click View History from the Bulk Email page, or navigate to Communications → View History.
- Use the status tabs to filter campaigns: Completed, Scheduled, Sending, or Failed.
- Each row shows the subject, number of recipients, delivery rate, open rate, status, and sent time. Open and delivery percentages are still stabilizing — treat them as directional, not exact, for now.
- To cancel a scheduled email before it sends, find it on the Scheduled tab and click Cancel Send in the Actions column.

Deliverability Tips
- Some inboxes — especially corporate or school-district email — apply spam filters that can delay or block newsletters. If a family reports they never received an email, ask them to check spam/junk before assuming it wasn't sent.
- For anything time-critical (an event starting today, a last-minute cancellation), follow up in another channel — text, phone, or your co-op's group chat — rather than relying on email delivery timing alone.
- Bulk Email is built for one-to-many announcements, not one-on-one conversations. For a reply from a single family, use direct email or a phone call instead.
Common Questions
Can I export my recipient list to send from Gmail or another email client instead? Bulk Email doesn't export a mailing list for use elsewhere. Sending through the tool keeps your placeholders, delivery status, and campaign history all in one place, so we recommend using it directly rather than working around it.
Can I set up a recurring send, like a weekly newsletter? Not yet — each campaign is a one-time send, either immediate or scheduled for a specific date and time. For a recurring newsletter, save a template and schedule (or send) it manually each time. Recurring sends may come in a future update.
Why isn't a member receiving my emails? Check that the family's email address on file is correct, that they haven't opted out of communications, and that their membership status matches the audience you selected (for example, "Active members only" excludes lapsed memberships). Also ask them to check spam/junk.
Can I attach files to a bulk email? Not currently — Bulk Email supports formatted text (Markdown) in the body, but not file attachments. Link to a hosted document (such as a Google Drive or Dropbox link) in your message instead.
Next Steps
You're ready to keep your families informed. Send your first newsletter today — share an upcoming event, a co-op update, or a welcome message for new members.
Want to save time on future emails? Set up a reusable template under Communications → Create Template so you can send consistent, on-brand messages with one click.
How to Manage Registrations and Track Attendance
Once you have created an event with registration enabled, CooplyHQ gives you a dedicated view to manage who is coming and to track attendance on the day.
Step 1: Open the Event Registration List
- Sign in to your co-op admin panel.
- In the left sidebar, click Events.
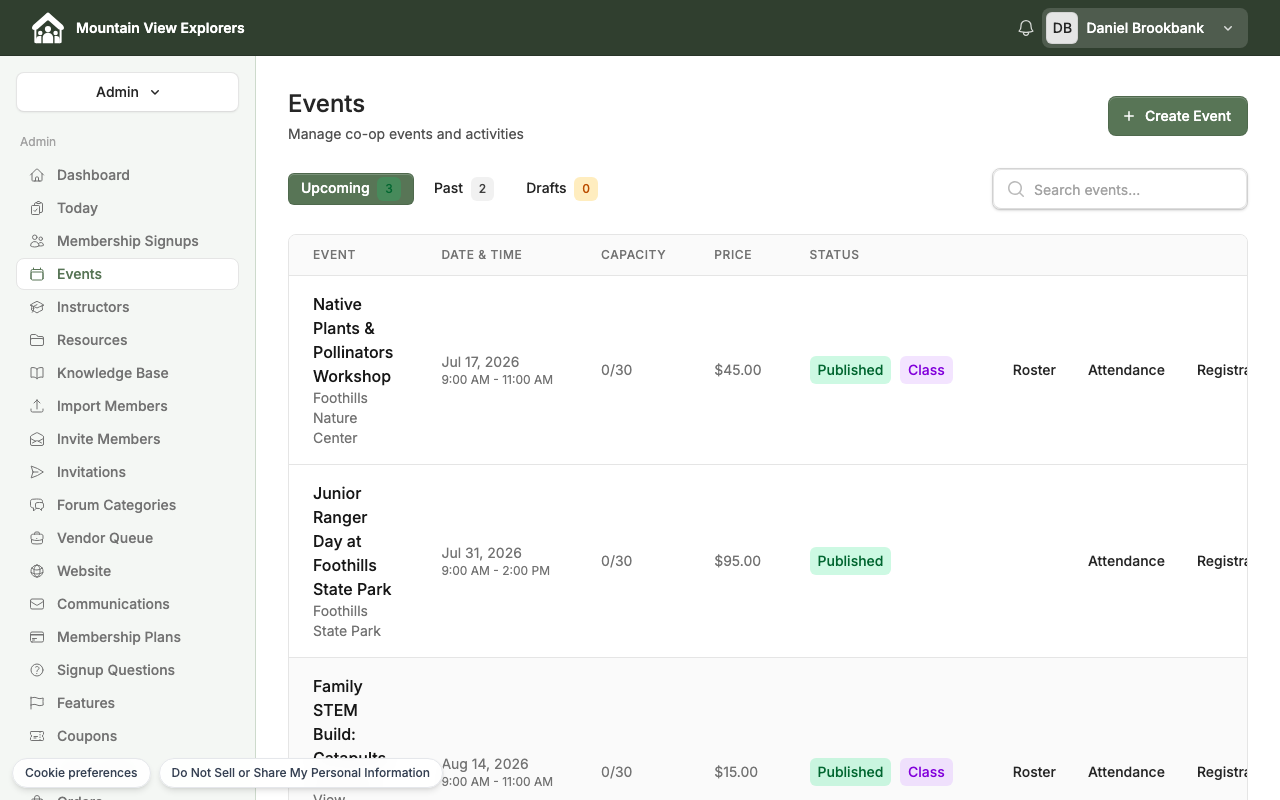
- Find the event you want to manage and click its title to open it.
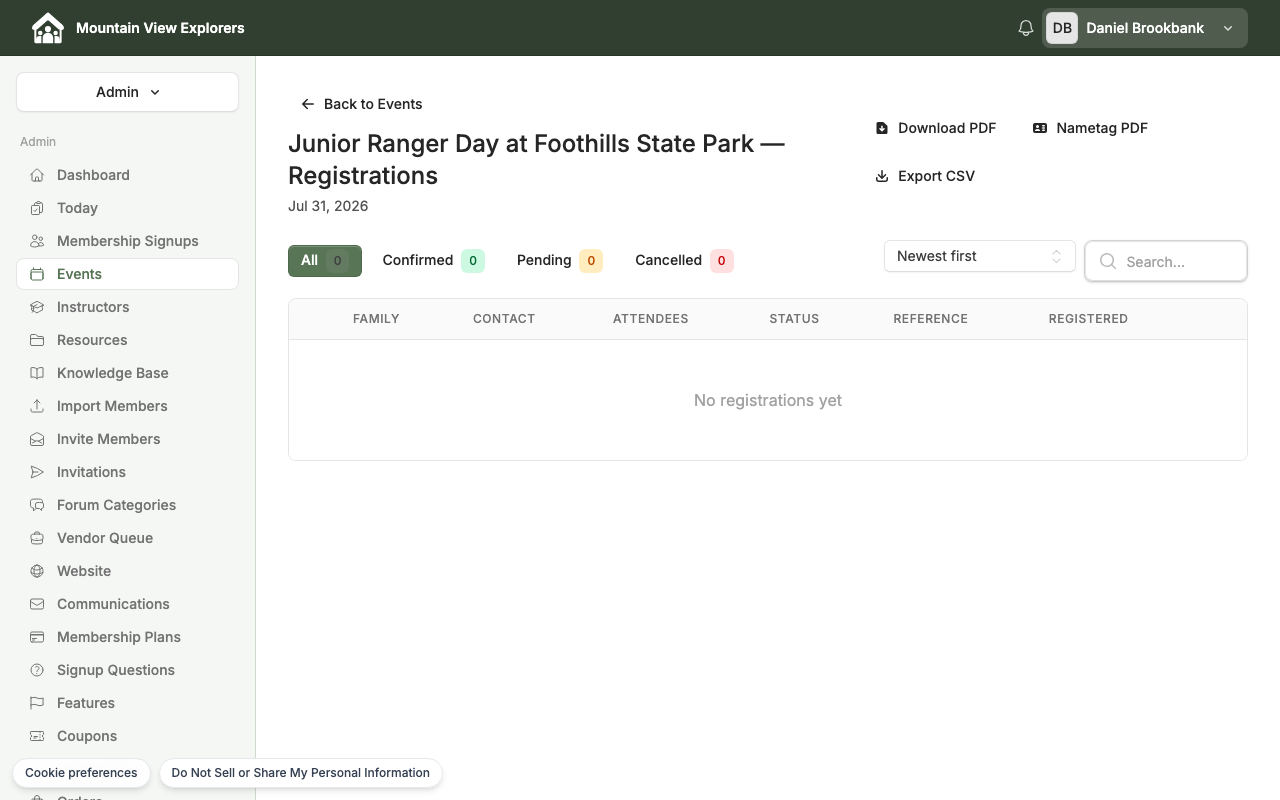
- Select the Registrations tab.
You will see a list of everyone who has registered, including their name, contact email, and registration date. Paid-event entries show the payment status.
Step 2: Manage Individual Registrations
From the Registrations tab you can:
- Add a registrant manually — click Add Registrant and enter the member's name. Use this when a family contacts you directly rather than registering online.
- Remove a registrant — click the three-dot menu next to a name and select Remove. This opens a spot back up if capacity is limited.
Note: Removing a registration does not automatically issue a refund for paid events. Issue any refund separately through Orders in the admin panel.
Step 3: Check In Attendees on the Day
On the day of the event, use the check-in view to mark who actually shows up.
- Open the event's Registrations tab (same steps as Step 1).
- As each family arrives, find their name in the list and click Check In.
The row updates to show a check-in timestamp. You can uncheck an attendee if you made a mistake — click Undo Check-In next to the name.
Tip: The check-in view works on a phone or tablet. Pull up the Registrations tab on your mobile browser at the door so you can check in families as they arrive.
Step 4: Record Attendance After the Event
If you were not able to mark attendance live, you can update attendance records after the event:
- Return to the event's Registrations tab.
- Click Check In next to each attendee who was present. Leave absent attendees unchecked.
All records are saved automatically. There is no separate "submit" step.
Step 5: Export the Attendance Report
To download a list of attendees — for your records, a partner organization, or a printable name-tag sheet:
- On the Registrations tab, click Export.
- Choose your format:
- CSV — opens in Excel or Google Sheets; includes name, email, registration date, and check-in status.
- PDF (Name Tags) — printable name-tag sheet sized for standard Avery labels.
- The file downloads immediately.
Next Steps
- To send a message to everyone registered for this event, see How to Send Newsletters and Announcements.
- To set up your next event, see How to Create an Event and Enable Member Registration.
How to Create an Event and Enable Member Registration
Overview
This guide walks you through creating an event on CooplyHQ and opening it for member registration. After completing these steps, the event will appear on your co-op's events page and members can register directly from their dashboard.
Part 1: Create the Event
Step 1: Go to Events in your admin panel
- Sign in to your co-op's CooplyHQ site.
- In the left sidebar, click Events.
You'll see a list of all events you've created. New co-ops will see an empty state with a prompt to create your first event.
Step 2: Open the Create Event form
- Click Create Event (top right of the Events page).
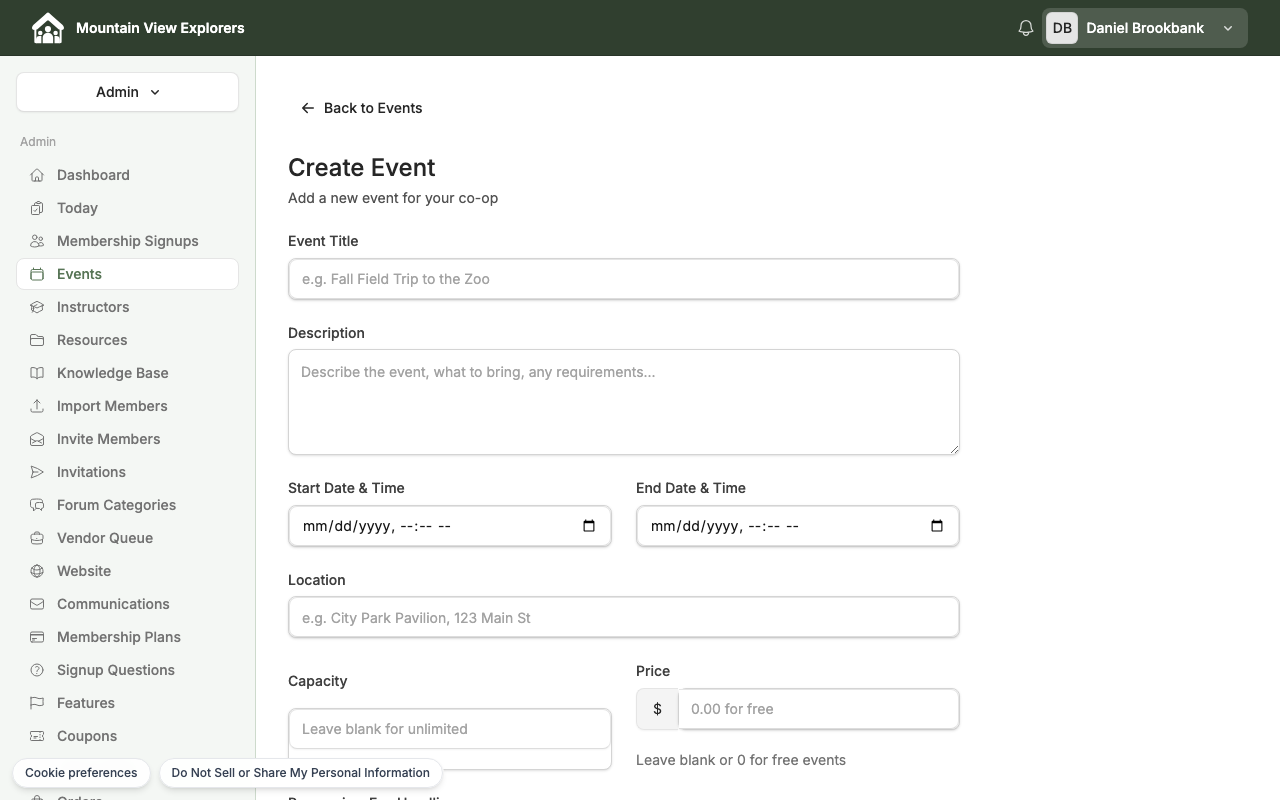
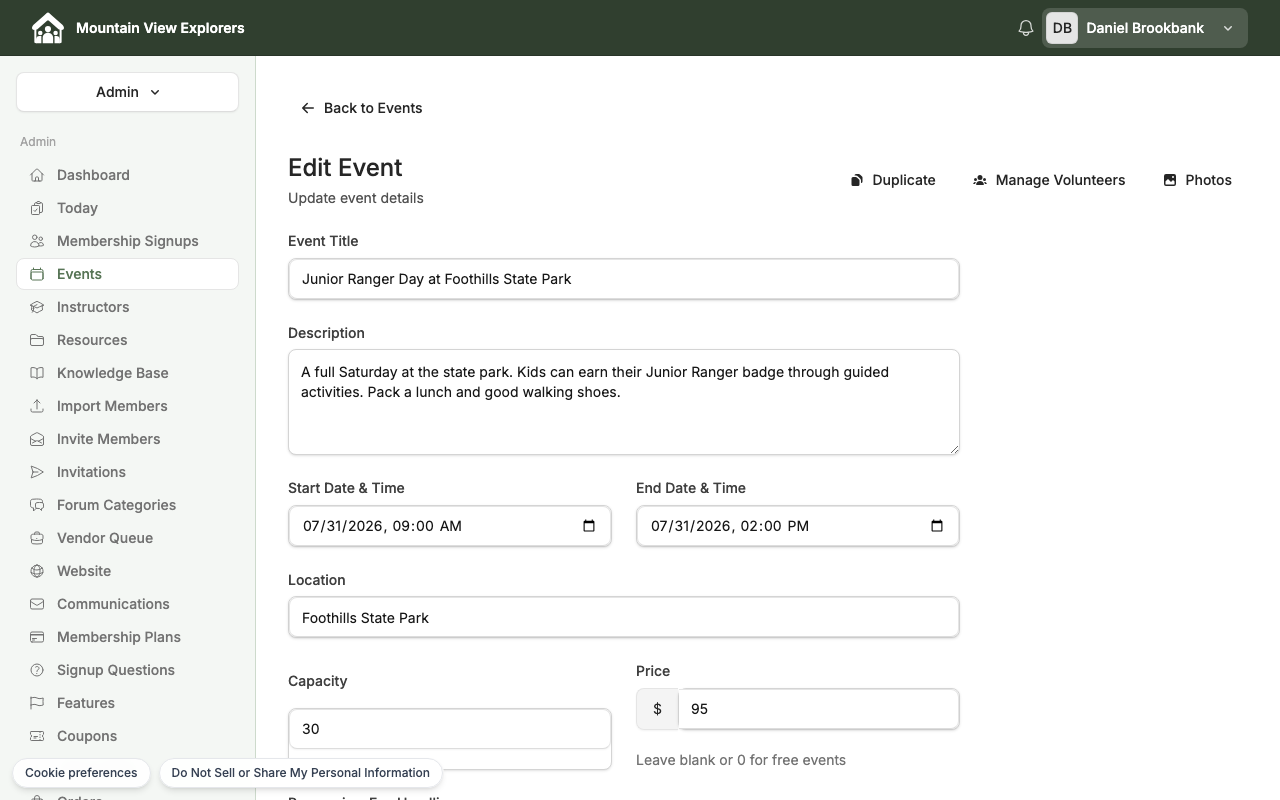
Step 3: Fill in the event title and description
- In the Event Title field, type a clear, descriptive name (e.g. Fall Field Trip to the Natural History Museum).
- In the Description field, add any details families should know — what to bring, where to meet, age suitability, etc.
Step 4: Set the date, time, and location
- Click the Start Date & Time field and pick the event date and start time.
- Optionally click End Date & Time and set when the event finishes.
- In the Location field, enter the address or venue name (e.g. City Park Pavilion, 123 Main St).
Part 2: Configure Capacity and Registration
Step 5: Set a capacity limit (optional)
- In the Capacity field, enter the maximum number of registrations you'll accept.
- Leave the field blank to allow unlimited registrations.
Registration closes automatically one day before the event start time. Capacity limits are enforced in real time — once the last spot is taken, the Register button disappears for new visitors.
Part 3: Set Event Pricing
Step 6: Set the price
- In the Price field, enter the dollar amount per registration (e.g. 12.00).
- Leave the field blank, or enter 0.00, if the event is free.
Fee handling — if you set a price, choose how processing fees are handled:
| Option | What members see |
|---|---|
| Absorb (default) | Members pay exactly the listed price. Your co-op covers the processing fee. |
| Gross-up | The processing fee is built into one combined price. Members see a single total with no separate fee line. |
Members receive a payment confirmation email automatically after a successful paid registration.
Part 4: Publish the Event
Step 7: Publish immediately or save as a draft
- Toggle Publish immediately on to make the event visible to members as soon as you save.
- Leave it off to save the event as a draft. You can publish it later from the event edit page.
Optional settings:
- Allow guest registration — enables non-members to register without a CooplyHQ account.
- Collect dietary/allergy information — adds a dietary preferences question to the registration flow.
Step 8: Save the event
- Click Create Event.
You'll be returned to the Events list, and a confirmation banner will appear. The event is now live if you toggled Publish immediately on.
Part 5: Member Registration Experience
Step 9: Members find the event
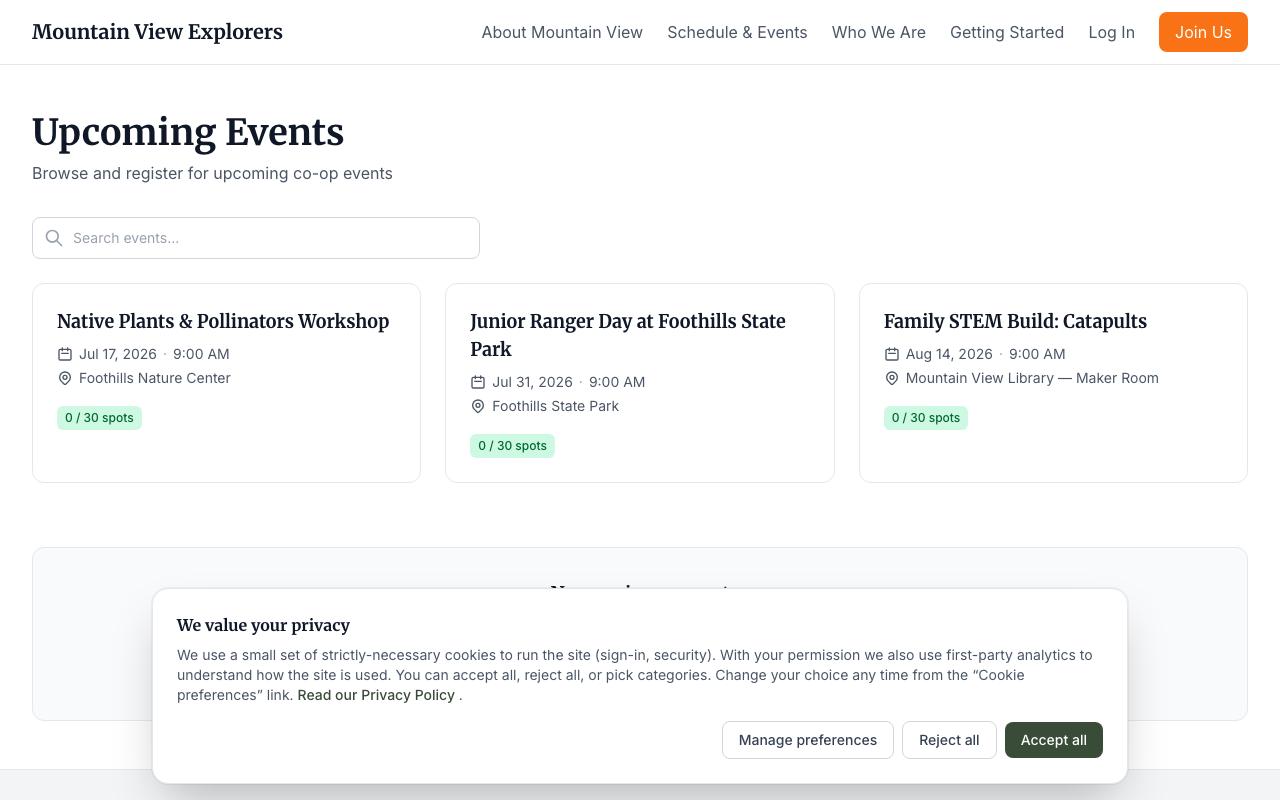
Once published, the event appears on your co-op's Events page, which members access from their member dashboard.
Step 10: Members register
- A member clicks the event name to open the event detail page.
- They click Register.
- For free events, registration is confirmed immediately and a confirmation email is sent.
- For paid events, the member is taken to a secure checkout page. After payment, they receive a payment confirmation email.
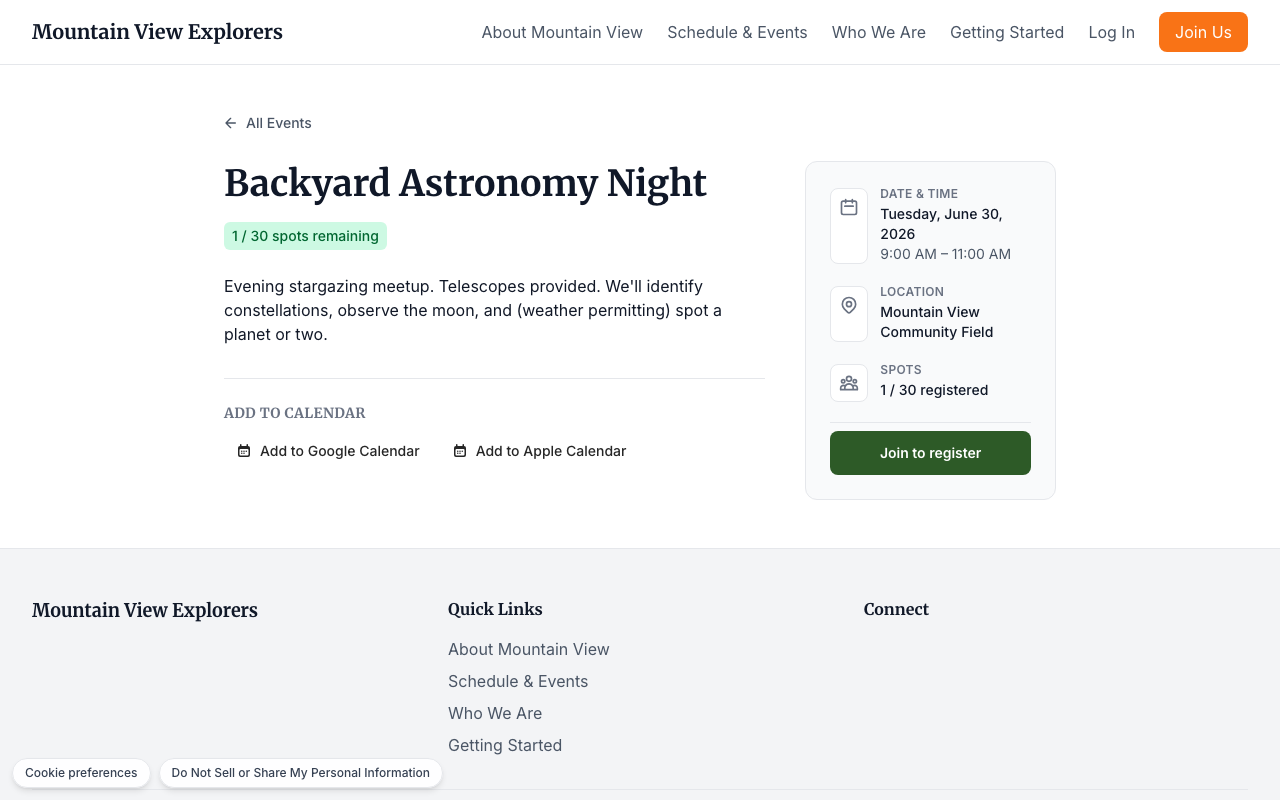
Members who are not signed in, or whose membership is not active, see a prompt to join or renew before they can register.
Tracking Registrations
After publishing, you can view who has signed up at any time:
- From the Events list, click the event name.
- Click Registrations in the admin tabs.
The registrations page shows each attendee's name, registration date, and payment status.
What's next
Now that your first event is live, consider:
- How to Set Up Membership Plans and Recurring Payments — make sure families are set up with an active plan before your event date
- Adding a recurring event series using the Recurring event toggle on the create form
How to Create an Event and Enable Member Registration
Overview
Events let you schedule activities — classes, field trips, co-op days — and give members a way to register directly through your site. This guide walks you through creating an event, configuring registration and pricing, publishing it, and what your members see when they sign up.
Before you start: Your co-op site must be active and your membership plans set up. If you are collecting payment for events, your Stripe account must be connected under Payouts & Billing.
Step 1: Navigate to Events
- Sign in to your co-op admin panel.
- In the left sidebar, click Events.
The Events page lists all your scheduled events. If you have not created any yet, you will see an empty state with a New Event button.
Step 2: Create a New Event
- Click New Event (top-right corner, or the button in the empty state).
The event creation form opens.
- Fill in the event details:
| Field | What to enter |
|---|---|
| Title | A clear, recognizable name (e.g., "Spring Co-op Day", "Math Class — Week 12") |
| Date | The date the event takes place |
| Start Time / End Time | When the event begins and ends |
| Location | Physical address, room name, or "Online" for virtual events |
| Description | Details families need to know — what to bring, parking, etc. |
Step 3: Configure Registration Settings
In the same form, scroll to the Registration section.
| Setting | What it does |
|---|---|
| Enable Registration | Turn on so members can sign up for the event |
| Capacity | Maximum registrants. Leave blank for unlimited. |
| Registration Opens | Date and time when sign-ups become available |
| Registration Closes | Date and time when sign-ups close (optional) |
Set Enable Registration to on. Enter a Capacity if your venue or session has a limit; otherwise leave it blank.
Step 4: Set Event Pricing
Under Pricing, choose whether the event is free or paid.
Free event
Select Free. Members register at no cost. No Stripe connection is required.
Paid event
Select Paid and enter the price in dollars.
When members complete registration for a paid event, they receive a payment confirmation by email. Their payment receipt is available under My Registrations in their member account.
Note: Use the Free option for $0 events rather than entering a price of $0.00. This keeps the registration flow simple and avoids unnecessary Stripe processing.
Step 5: Publish the Event
- Once all settings are filled in, click Publish Event.
The event is now live on your co-op site. Members can see it on the public Events page and register from there.
Tip: To save your work and return later without making the event visible to members, click Save Draft instead. Drafts appear only in the admin panel.
Step 6: Member Registration Experience
Here is what a member sees when they visit your Events page.
- The member clicks the event title or a Register button.
- The event detail page shows the date, time, location, and description.
- For free events, the member clicks Register.
For paid events, the member clicks Register & Pay and enters payment details on a secure Stripe checkout page. - After completing registration, the member receives a payment confirmation by email and can view their spot under My Registrations.
Next Steps
- To view who has registered and track attendance, see How to Manage Registrations and Track Attendance.
- To contact registered members, see How to Send Newsletters and Announcements.
How to Manage Your Co-op Calendar
Overview
CooplyHQ gives your co-op two calendar tools that work together:
- The Admin Events list — where you create and manage events
- The Public Event Calendar — a month-view grid where members and families browse your schedule
This guide covers both.
Step 1: Open the Events list in your admin panel
- Sign in to your admin panel.
- In the left sidebar, click Events.
The Events page is your central place to manage your co-op's schedule. Every event you publish here appears on the public Event Calendar.
Step 2: Understand what is on your calendar
The Events list organizes all your events by status using three tabs.
| Tab | What it shows |
|---|---|
| Upcoming | Published events with a future date — visible to members |
| Past | Events that have already occurred |
| Drafts | Events saved but not yet published — admin-only |
Each event row shows:
- Event name and location
- Date and start/end time
- Capacity (spots taken / total)
- Price (Free or paid amount)
- Status badge (Published or Draft)
Use the Search events box to filter by keyword when your list grows long.
Step 3: Add a new event to your calendar
- On the Events page, click + Create Event (top right).
- Fill in the event details.
- Click Publish Event to make it visible to members.
Note: Events are added and edited from the admin Events page. The public calendar grid is view-only — it cannot be used to create or edit events.
For full event creation instructions, see How to Create an Event and Enable Member Registration.
Step 4: View the public Event Calendar — what families see
Members and families browse your schedule at:
yoursite.cooplyhq.com/calendar
To view it yourself, click your co-op's name in the top-left corner of the admin panel to open your public site, then navigate to Schedule & Events in the top navigation.
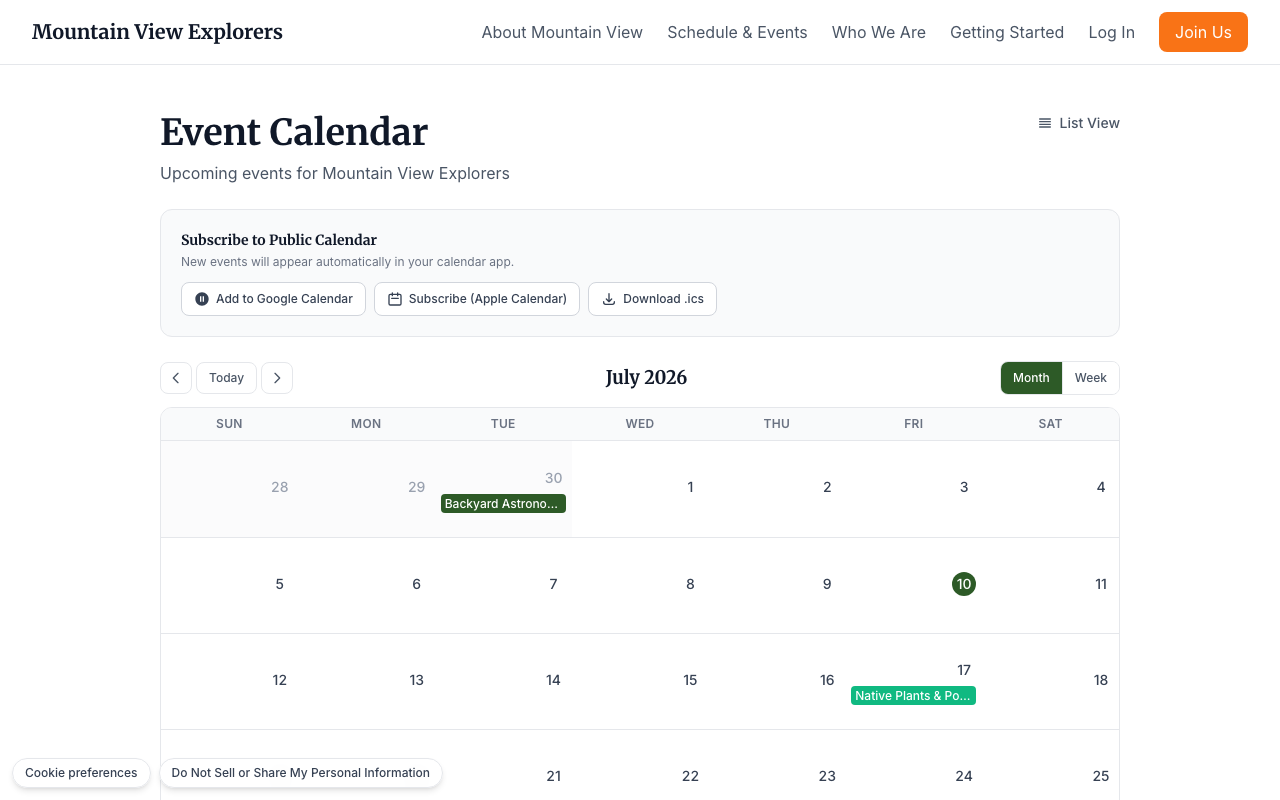
The public Event Calendar shows:
- A month grid with published events placed on their dates
- Navigation arrows (< and >) to move forward and backward by month or week
- A Today button to return to the current date
- A Week button to switch to a week-by-week layout
Subscribe to the calendar
At the top of the calendar page, families see a Subscribe to Public Calendar section.
| Option | What it does |
|---|---|
| Add to Google Calendar | Subscribes to your co-op's live calendar — new events appear automatically |
| Subscribe (Apple Calendar) | Subscribes in Apple Calendar or any compatible calendar app |
| Download .ics | Downloads a snapshot of current events in iCal format |
Sharing this subscription option with families means they always see your latest events without checking your site manually.
Step 5: Browse upcoming events in list format
Families can also view your events as a searchable list at:
yoursite.cooplyhq.com/events
Each event card shows:
- Event name
- Date, time, and location
- Spots remaining (e.g., "4 / 30 spots")
Members can use the Search events box to filter by keyword. To register, they click the event card and follow the steps on the event detail page.
Next Steps
- To create a new event, see How to Create an Event and Enable Member Registration.
- To review who has registered for an event, see How to Manage Registrations and Track Attendance.
How to Invite Families and Manage Your Member Directory
Overview
Once your co-op site is set up, you are ready to bring families on board. This guide covers:
- Sending a membership invitation to a family
- What the invited family sees when they follow the link
- Tracking invitation status
- Viewing and searching the member directory
- Opening a member record and updating a member's role
Step 1: Send an invitation
- Sign in to your admin panel.
- In the left sidebar, click Invite Members.
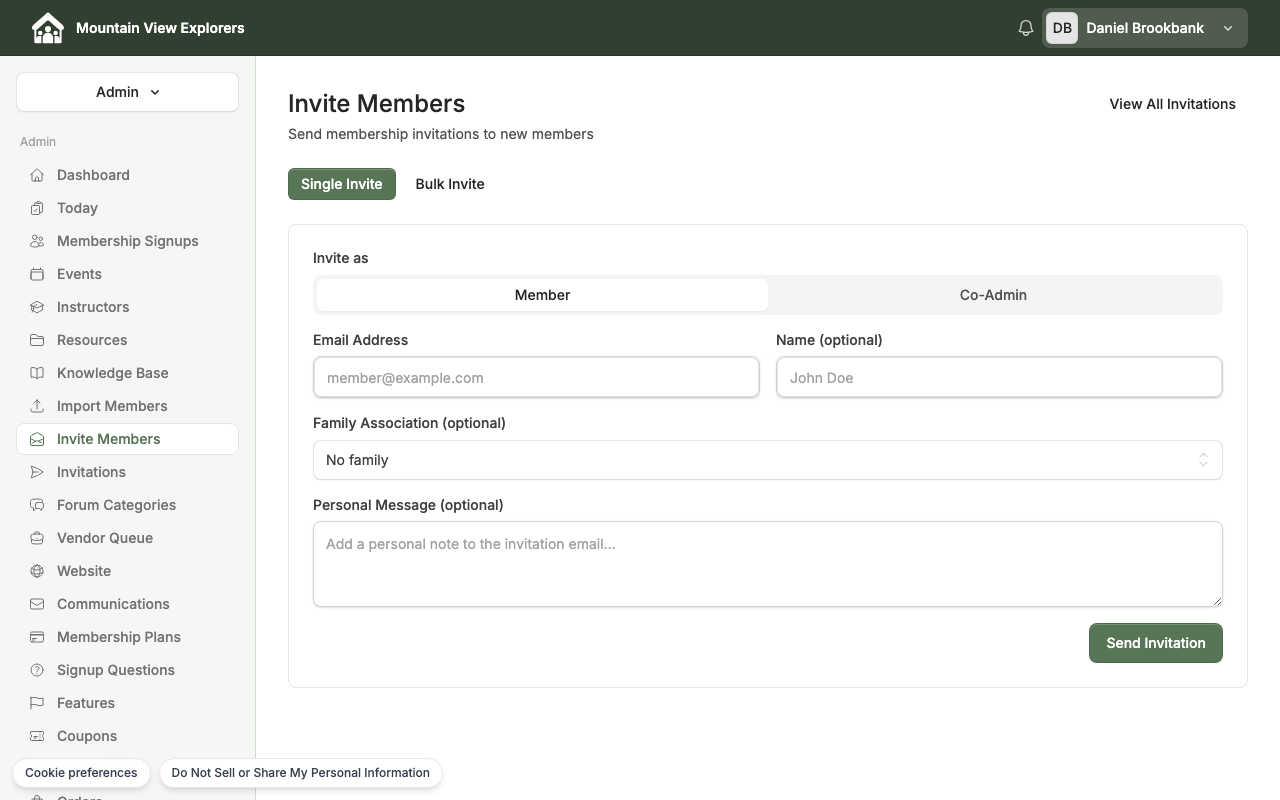
The Invite Members page opens with the Single Invite tab selected.
- Under Invite as, choose the role you are assigning:
| Option | Who it is for |
|---|---|
| Member | A family joining to participate in co-op activities |
| Co-Admin | A trusted parent you want to help manage the co-op |
- Enter the family's Email Address (required).
- Optionally, add the family's Name and select their Family Association from the dropdown if you have families already set up.
- Optionally, type a short note in the Personal Message field — this appears in the invitation email.
- Click Send Invitation.
CooplyHQ sends the family an email with a link to complete their membership application.
Tip: To invite several families at once, click the Bulk Invite tab and follow the on-screen instructions.
Step 2: What the family sees
When a family receives the invitation email and clicks the link, they arrive at your co-op's membership application.
The application walks the family through three steps:
- Contact Info — primary guardian's name, email address, and phone number
- Household — adding children and other household members
- Membership — selecting a membership plan and completing payment (if applicable)
Once submitted, the family appears in your Membership Signups queue for approval.
Step 3: Track invitations
To see the status of every invitation you have sent:
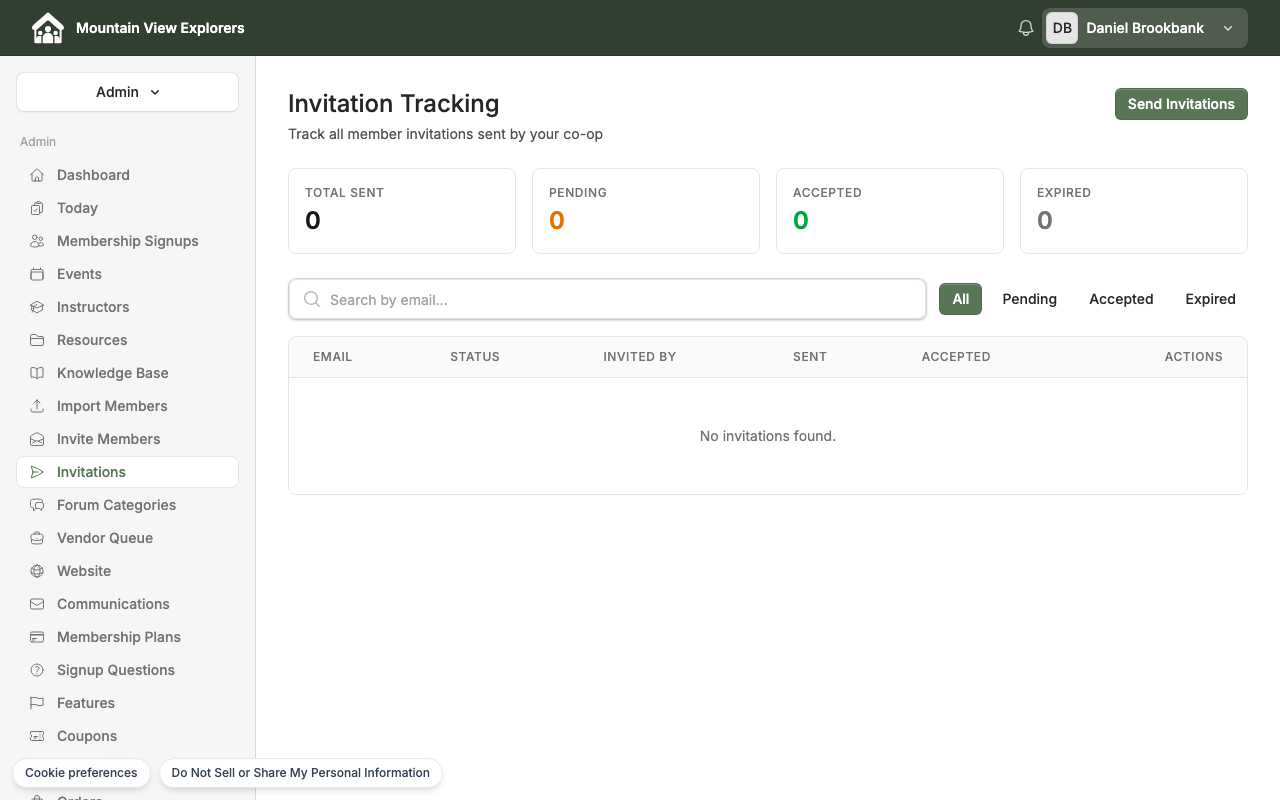
The Invitation Tracking page shows summary counts at the top:
| Counter | Meaning |
|---|---|
| Total Sent | All invitations ever sent |
| Pending | Sent but not yet accepted |
| Accepted | Family completed their application |
| Expired | Invitation link is no longer valid |
Use the Search by email box to find a specific invitation, or use the All / Pending / Accepted / Expired filter tabs to narrow the list.
From the Actions column you can resend or cancel individual invitations.
Step 4: View the member directory
The member directory shows every person who has joined your co-op.
- Go to your admin Dashboard.
- In the dashboard widgets, click Active Families to open the member directory.
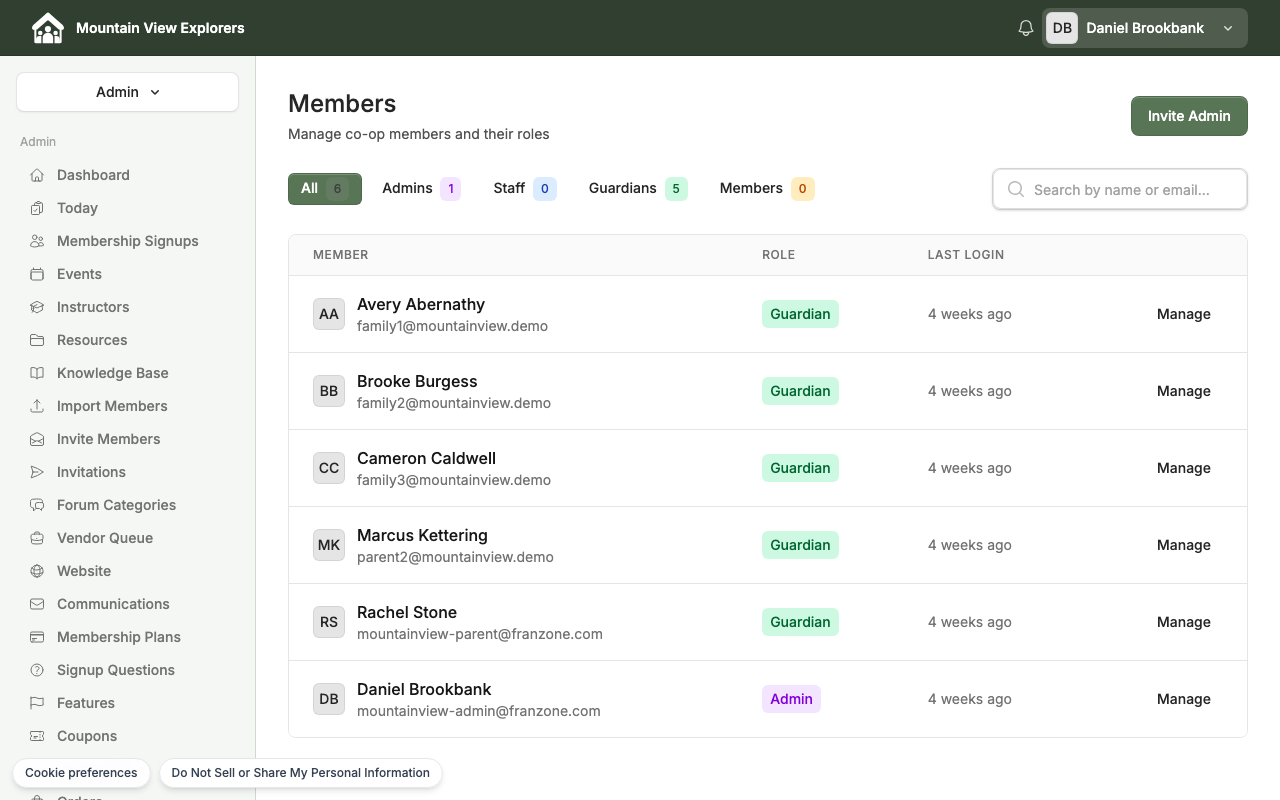
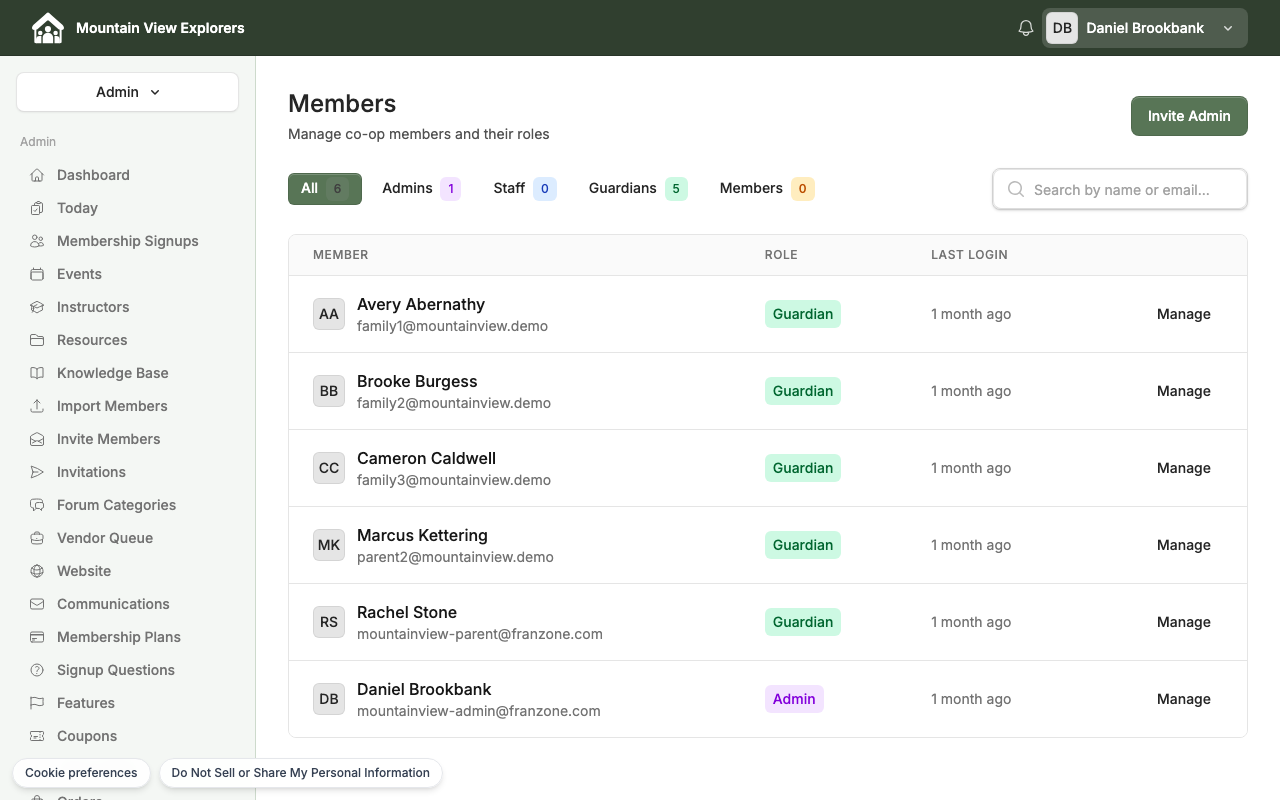
The Members page shows a table with each member's name, email, role, and the date they last logged in.
Filter by role
Use the filter buttons at the top of the list to show only members with a specific role:
| Filter | Who it shows |
|---|---|
| All | Every member, regardless of role |
| Admins | Co-op administrators |
| Staff | Staff members who help manage events and registrations |
| Guardians | Parents and guardians who have completed membership |
| Members | Members with basic access |
Search by name or email
Type in the Search by name or email box to filter the list as you type. This is useful when your co-op has many members and you are looking for a specific person.
Step 5: Open a member record
- In the member directory, find the person you want to view.
- Click Manage on their row.
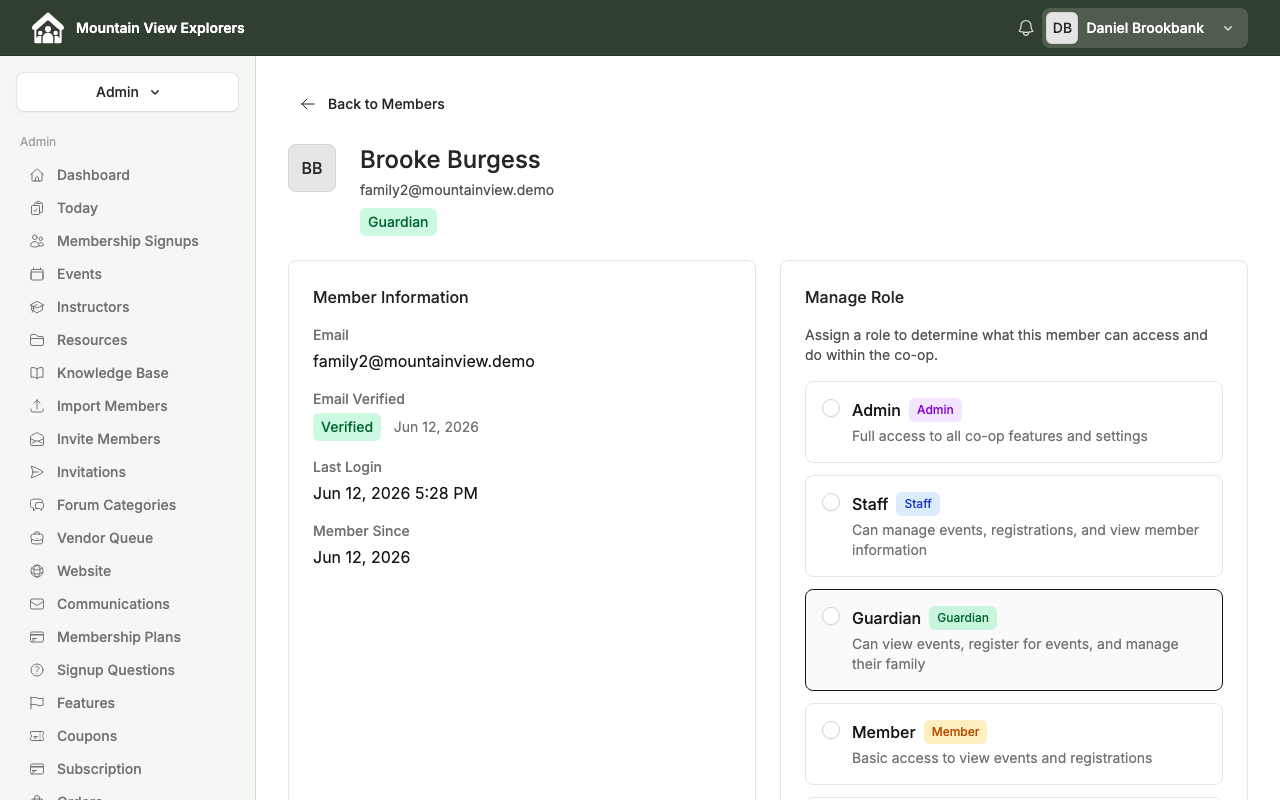
The member detail page shows two sections:
Member Information
| Field | What it shows |
|---|---|
| The member's login email address | |
| Email Verified | Whether the email has been verified, and when |
| Last Login | The date and time of their most recent sign-in |
| Member Since | The date their account was created |
Manage Role
The current role is highlighted. See Step 6 to change it.
Step 6: Change a member's role
- On the member detail page, find the Manage Role section.
- Select the role you want to assign:
| Role | Access level |
|---|---|
| Admin | Full access to all co-op features and settings |
| Staff | Can manage events, registrations, and view member information |
| Guardian | Can view events, register for events, and manage their family |
| Member | Basic access to view events and registrations |
- Click Update Role.
A confirmation message appears when the role is saved.
Next steps
- To approve a family's membership application after they sign up, see How to Review and Approve Membership Signups.
- To create an event for your members to register for, see How to Create an Event and Enable Member Registration.
How to Configure Your Co-op Settings
Overview
Before inviting families to your co-op, take a few minutes to configure your co-op's identity. CooplyHQ gives you two places to do this:
- Co-op Profile (in the setup wizard on your dashboard) — set your co-op's name and tagline
- Website > Site Settings — configure your logo, contact email, header display, and signup options
This guide walks through both.
Step 1: Set your co-op name and tagline
When you first log in, your dashboard shows a "Let's get your co-op set up" card. This is your setup checklist.
- Sign in to your admin panel at
yourcoopname.cooplyhq.com. - On the Dashboard, locate the setup checklist card.
- Click Start next to Co-op Profile.
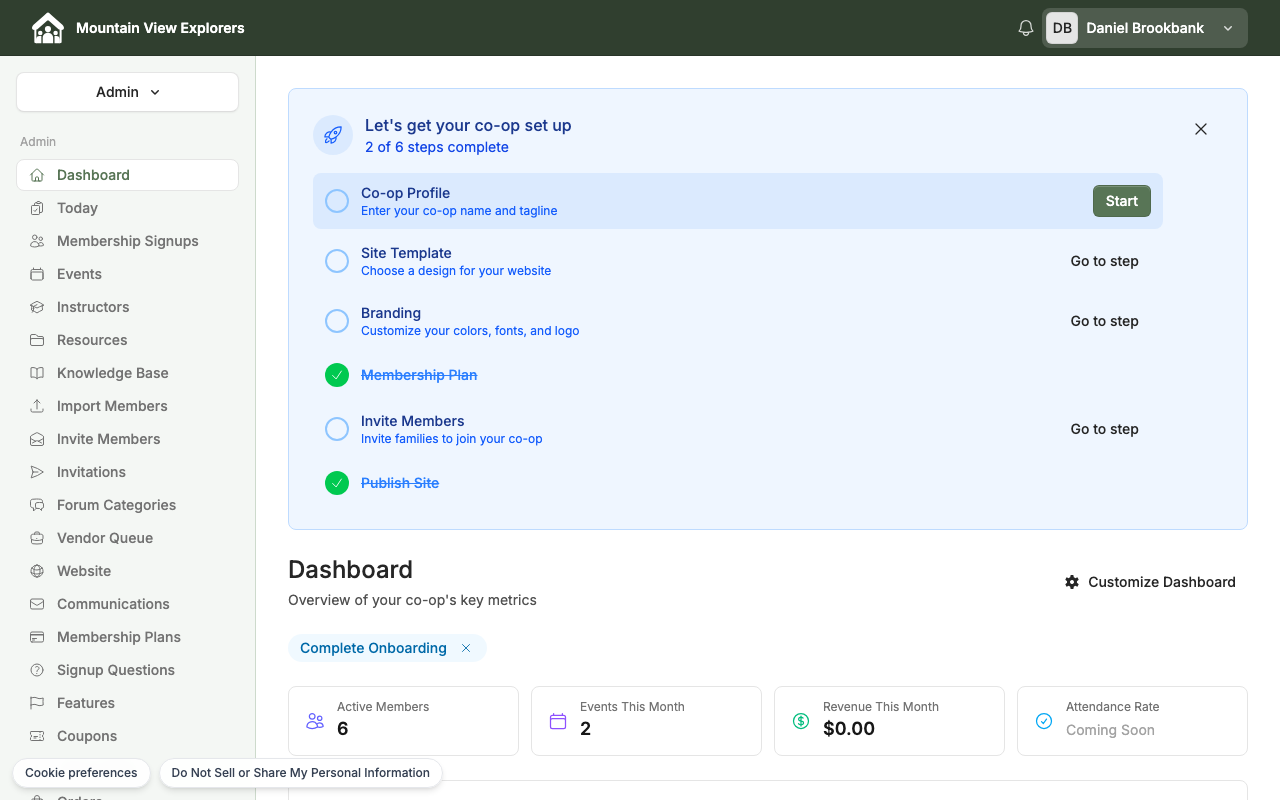
- In the dialog that opens, enter your Co-op Name (required). This name appears on your website and throughout the admin panel.
- Optionally, enter a Tagline — a short phrase describing your co-op (for example, "Learning together, growing together").
- Click Next to save and continue with the setup wizard, or close the dialog to return to the dashboard.
Step 2: Navigate to Site Settings
Your website branding settings — logo, contact email, header display, and more — live in the Website section.
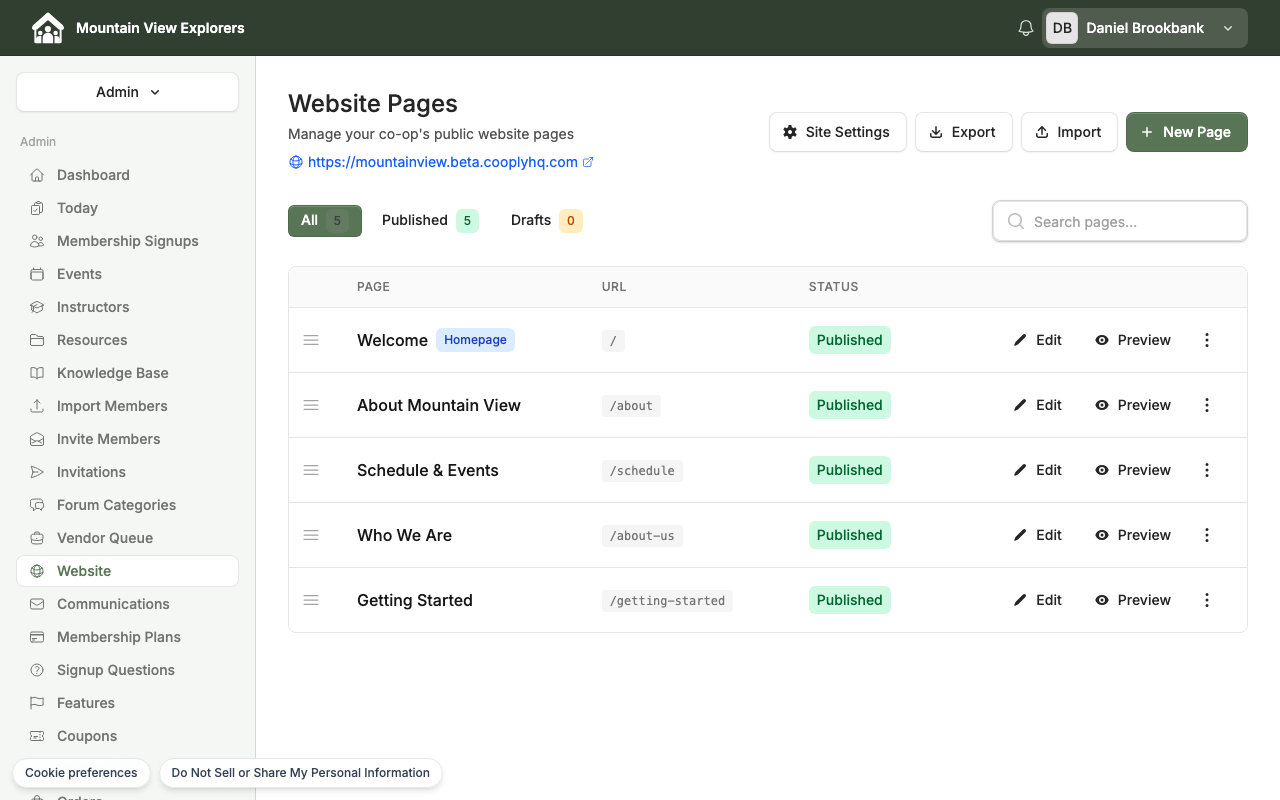
- On the Website Pages screen, click Site Settings in the top right corner.
The Site Settings page opens on the Branding tab.
Step 3: Configure branding settings
The Branding tab has four sections:
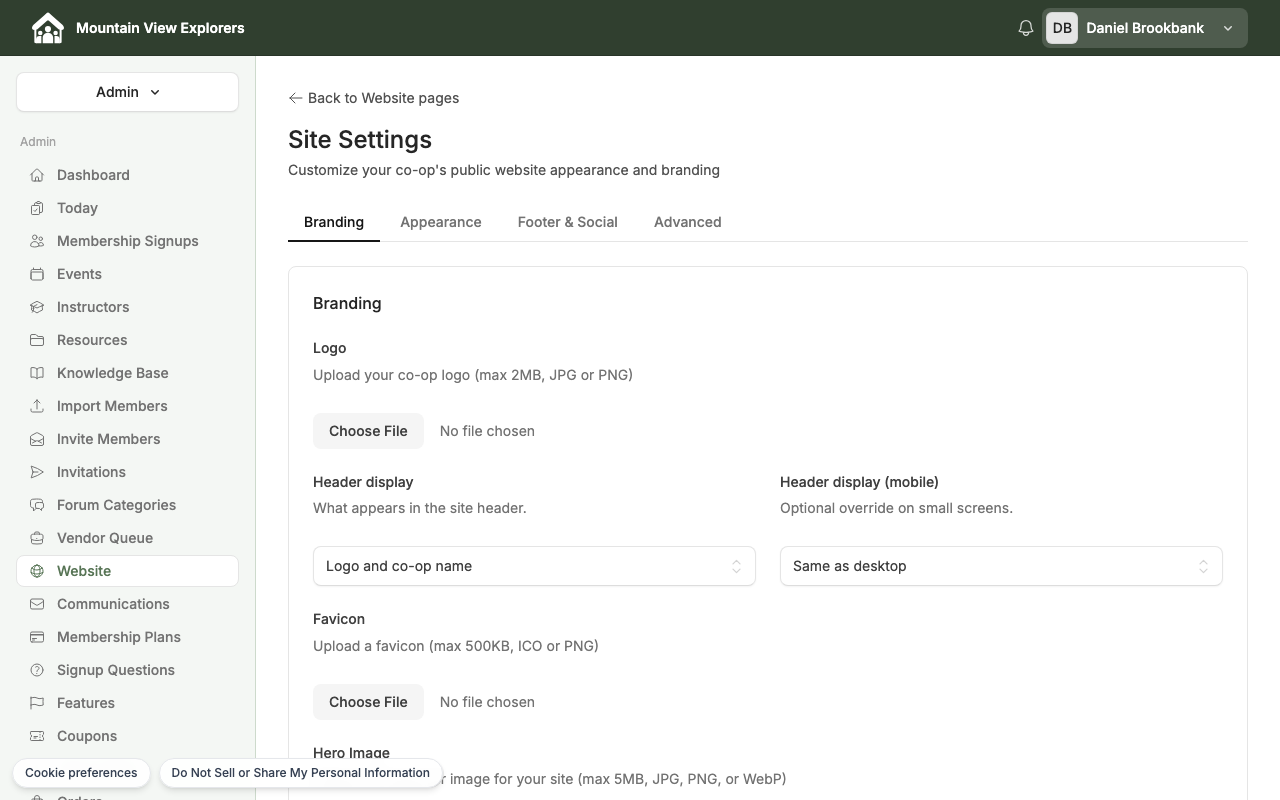
Logo
Upload your co-op's logo (max 2 MB, JPG or PNG). This image appears in your public website header.
Header display
Choose what appears in your website's header:
| Option | What visitors see |
|---|---|
| Logo and co-op name | Your logo image next to your co-op's name |
| Logo only | Your logo image, no text |
| Co-op name only | Your co-op's name in text, no logo |
You can also set a separate Header display (mobile) if you want a different layout on small screens. Leave it set to Same as desktop to use one setting for all devices.
Favicon
Upload a small browser-tab icon for your website (max 500 KB, ICO or PNG).
Hero Image
Upload a default banner image that appears at the top of your website's homepage (max 5 MB, JPG, PNG, or WebP).
Tagline and Contact Email
Scroll down past the image uploads to find two text fields:
- Tagline — A short description of your co-op, displayed on your public website. If you already entered a tagline in the setup wizard, it appears here pre-filled.
- Contact Email — A public contact email address shown on your website (for example,
info@yourcoopname.org).
Step 4: Configure signup settings
Still on the Branding tab, scroll to the Signup Settings section:
If you are not yet ready to accept new members, turn the toggle off.
Step 5: Save your settings
Click Save Settings at the bottom of the page. A confirmation message appears at the top of the screen confirming your changes were saved.
What's next
Now that your co-op's settings are configured, you're ready to invite families. See How to Invite Families and Manage Your Member Directory for next steps.
How to View and Manage Membership Payments
Overview
The Orders and Payouts sections in your admin panel let you track all membership payment activity and monitor funds deposited to your bank.
- Orders — every payment transaction tied to your membership plans
- Payouts — the Stripe transfer history showing when collected funds hit your bank account
Note: The screenshots below were captured before any membership payments were processed. Screenshots showing populated order rows, order detail views, and payout history will be added once active payment data is available.
Step 1: Open the Orders page
- Sign in to your admin panel at
yourcoopname.cooplyhq.com. - In the left sidebar, scroll down and click Orders.
The Orders page opens. When families have completed checkout, each payment appears as a row in the list.
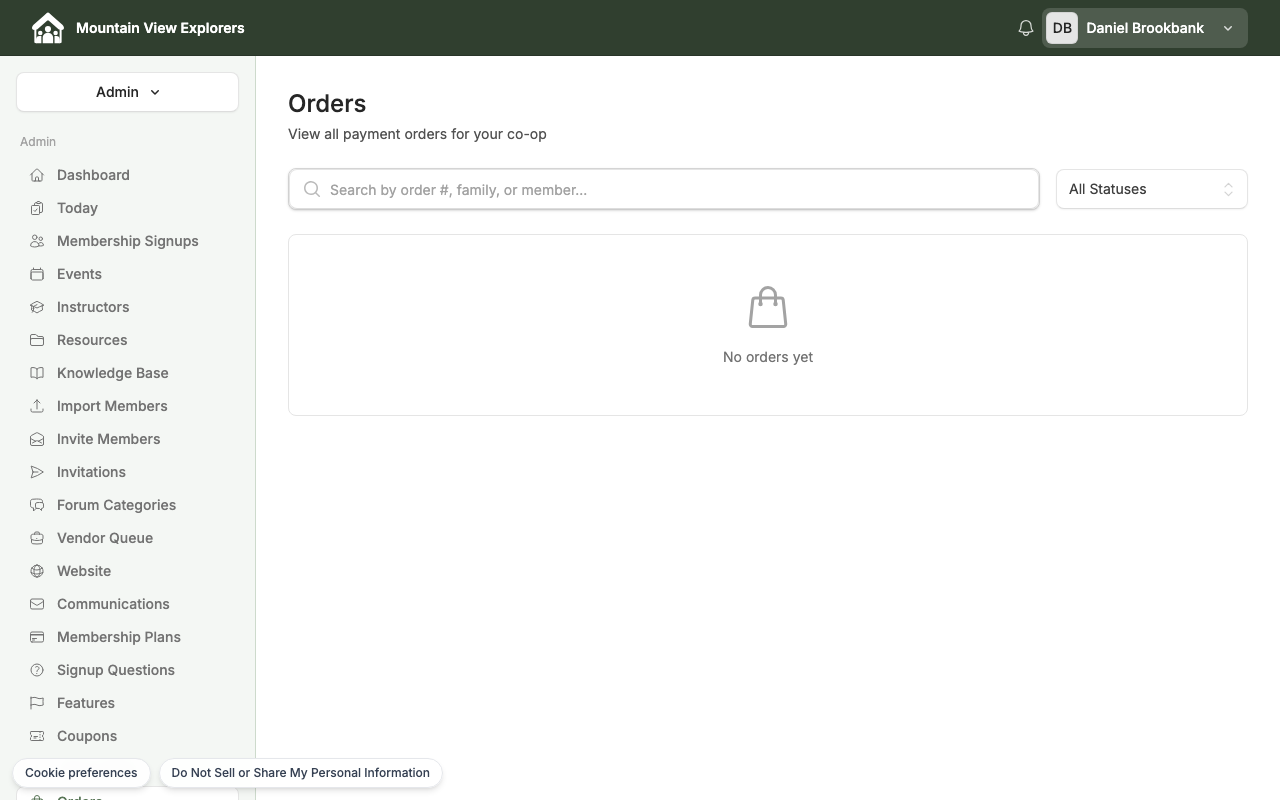
Step 2: Understand the Orders list
Once payments exist, each row in the Orders list shows:
| Column | What it shows |
|---|---|
| Date | When the order was placed |
| Order # | Unique reference number for the payment |
| Family | The family who made the payment |
| Type | The membership plan purchased |
| Amount | Payment amount charged |
| Status | Current payment status |
Payment statuses:
| Status | Meaning |
|---|---|
| Active | Payment succeeded; membership is in good standing |
| Past due | A renewal charge failed; the membership may lapse if not resolved |
| Failed | The payment attempt did not go through |
| Canceled | The membership was canceled |
Populated order list screenshot coming soon. This will be added after Stripe is connected and families have completed checkout.
Step 3: Search and filter orders
Use the controls at the top of the Orders list to find a specific payment:
- Search bar — type an order number, family name, or member name to narrow the list
- All Statuses dropdown — filter to a specific status (for example, select Failed to see all payments that need attention)
Step 4: View an individual order
Click any order row to open the order detail view. The detail view shows:
- Order number, date, and membership plan
- Family and member name
- Payment amount and payment method on file
- Full payment history for that order, including any retry attempts
Order detail screenshot coming soon. This will be added once orders exist in the demo account.
Step 5: Handle a failed payment
When a renewal payment fails, CooplyHQ and Stripe handle the initial response automatically:
- The family is notified — they receive an email prompting them to update their payment method.
- The order status updates — the row shows Past due or Failed in the Orders list.
- Stripe retries the charge — Stripe automatically retries failed payments on a schedule set in your Stripe dashboard.
As the admin, you can monitor failed payments by filtering the Orders list to Failed or Past due and following up directly with affected families if the payment is not resolved after retries.
Step 6: View payouts
Payouts show when funds collected from membership payments are transferred to your bank account.
- If Stripe is not yet connected, click Set up payouts to begin the Stripe onboarding flow. See How to Set Up Membership Plans and Recurring Payments for a full walkthrough of the Stripe setup process.
- Once Stripe is connected, the Recent Payouts section shows each transfer — the date, amount, and destination bank account.
Recent Payouts screenshot coming soon. This will be added after Stripe is connected and at least one payout has been issued.
What's next
- How to Set Up Membership Plans and Recurring Payments — create the plans families purchase and connect Stripe
- How to Invite Families and Manage Your Member Directory — invite families and manage their membership status
How to Review and Approve Membership Signups
Overview
When families submit a membership application through your co-op's public website, their application lands in the Membership Signups queue. You review each application and approve, decline, or put it on hold.
Note: The screenshots below were captured before any membership applications were submitted. Screenshots showing populated application rows and the application detail view will be added once real signups exist in the demo account.
Step 1: Open the Membership Signups queue
- Sign in to your admin panel at
yourcoopname.cooplyhq.com. - In the left sidebar, click Membership Signups.
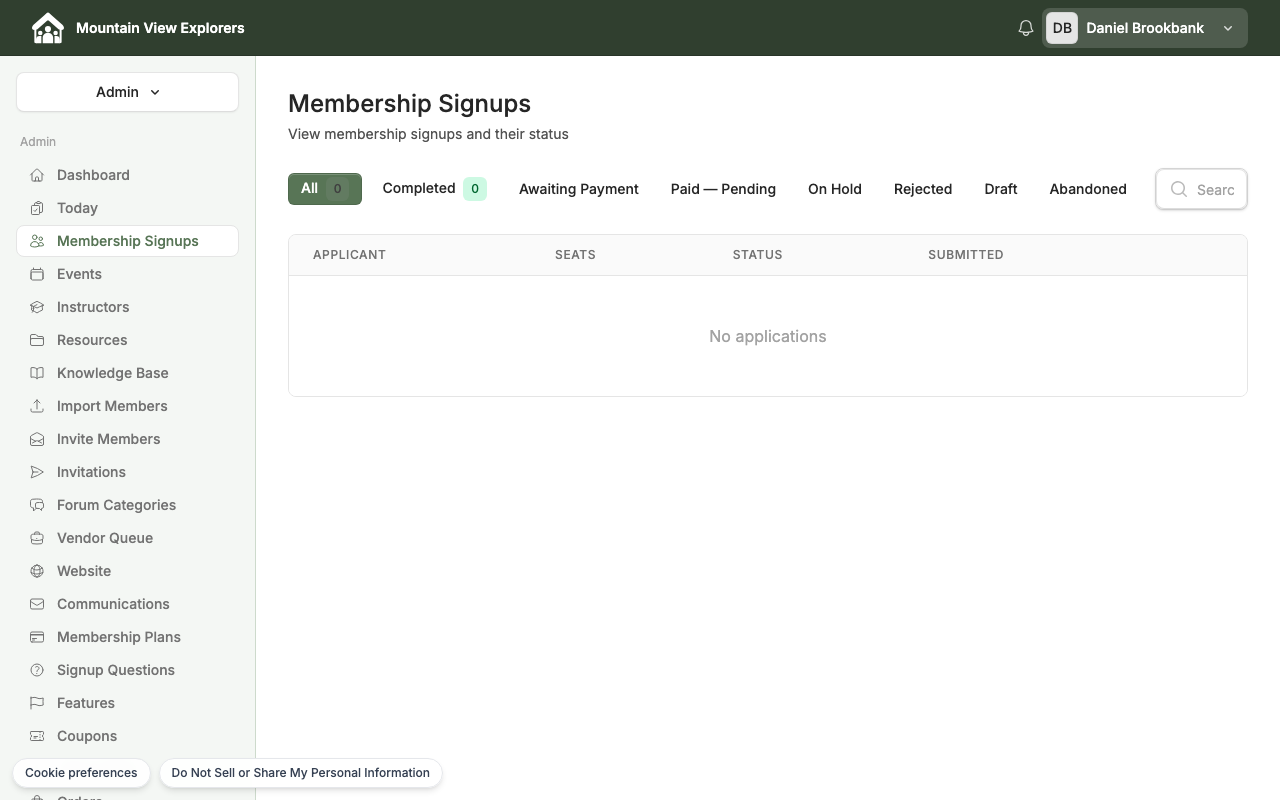
The Membership Signups page opens and shows all applications, organized by status tab.
Step 2: Understand the application statuses
Use the status tabs at the top of the page to filter applications:
| Tab | What it shows |
|---|---|
| All | Every application regardless of status |
| Completed | Applications that are fully approved and the family has active membership |
| Awaiting Payment | Approved applications waiting for the family to complete payment |
| Paid — Pending | Payment received; awaiting your final approval |
| On Hold | Applications you have paused pending more information |
| Rejected | Applications you have declined |
| Draft | Incomplete applications the family has not yet submitted |
| Abandoned | Applications started but not submitted within the expiry window |
Each row in the list shows:
| Column | What it shows |
|---|---|
| Applicant | The primary contact name for the applying family |
| Seats | Number of membership seats requested |
| Status | Current application status |
| Submitted | Date the application was submitted |
Populated application list screenshot coming soon. This will be added once families have submitted membership applications.
Step 3: Review an application
- Click any row in the Membership Signups list to open the application detail.
The application detail page shows:
Primary Contact
- Full name, email address, and phone number of the parent or guardian who submitted the application
Household Details
- Names and ages of household members being added as co-op members
- Total seats requested
Membership Plan
- The plan the family selected and its price
Actions panel
Application detail screenshot coming soon. This will be added once a real application exists in the demo account.
Step 4: Approve an application
- On the application detail page, click Approve in the Actions panel.
- Confirm the approval in the dialog that appears.
What happens next:
- If the selected membership plan has a cost, the application moves to Awaiting Payment and the family receives an email with a link to complete checkout.
- If the plan is free, the application moves directly to Completed and the family receives access to your co-op.
- The family appears in your member directory once their status reaches Completed.
Step 5: Put an application on hold
Use Put On Hold when you want to pause an application without declining it — for example, if you need more information from the family or are at capacity.
- On the application detail page, click Put On Hold.
- Optionally, add a reason in the dialog.
- Click Confirm to save.
The application moves to the On Hold tab. You can return to it at any time and approve or reject it.
Step 6: Reject an application
- On the application detail page, click Reject.
- Optionally, add a reason in the dialog. The family will not see this reason unless you choose to communicate it separately.
- Click Confirm to reject.
The application moves to the Rejected tab. The family is notified by email that their application was not approved.
What's next
- How to Invite Families and Manage Your Member Directory — invite families directly and manage their membership status
- How to View and Manage Membership Payments — track payment orders and Stripe payouts once families have completed checkout
How to Grant Website Editor Access (Content Editor Role)
Placeholder — will update after image upload.
How to Grant Website Editor Access (Content Editor Role)
Placeholder - will update after image upload.
How to Grant Website Editor Access (Content Editor Role)
Placeholder.
How to Grant Website Editor Access (Content Editor Role)
What the Content Editor role is
The Content Editor role lets a member edit your co-op's public website pages — and nothing else. They cannot view your member list, access billing, or change co-op settings.
Use this role when you want a volunteer or parent to keep the website updated without handing over the keys.
Content Editors can:
- Edit and save website pages
- Preview published pages
Content Editors cannot access:
- Member directory or family information
- Billing, payments, or membership plans
- Co-op settings or other admin areas
How to assign the Content Editor role
Step 1 — Go to Members
From the Admin panel, click Members in the left sidebar.
Step 2 — Open the member's profile
Find the person you want to give website editor access. Click Manage on their row.
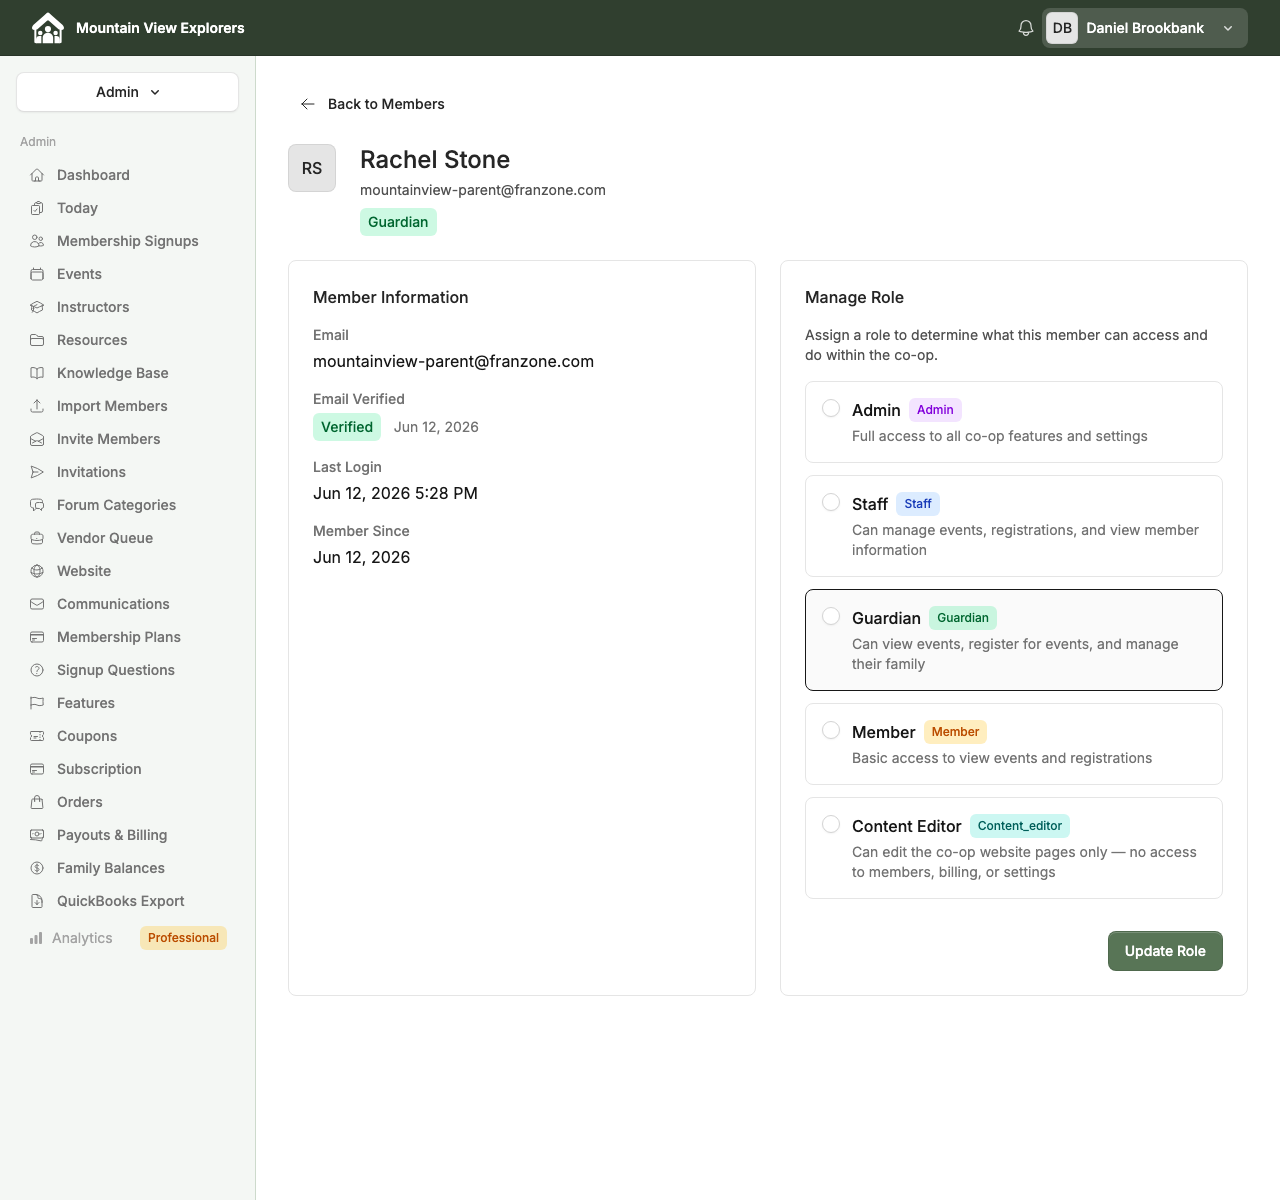
The Manage Role panel lists all available roles. Each role shows what it can and cannot do.
Step 3 — Select Content Editor and save
Scroll to the bottom of the role list and select Content Editor.
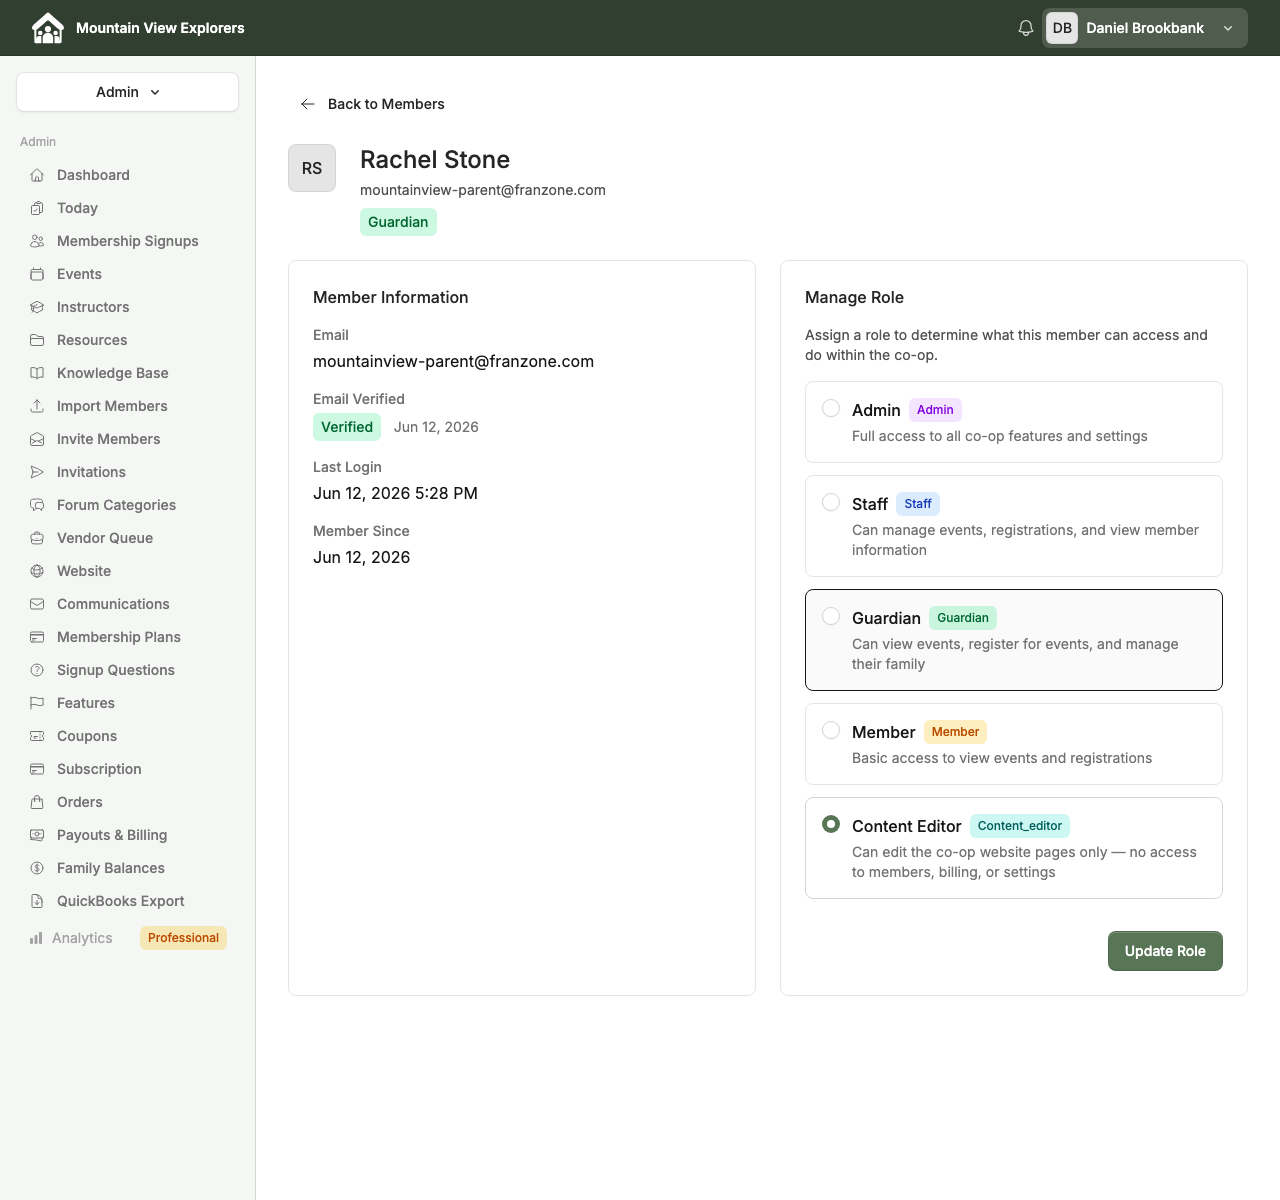
Click Update Role. A green confirmation banner will appear: Role updated to content_editor successfully.
The member can now log in and edit your co-op's website pages.
What the Content Editor sees
When a Content Editor logs in, they land on the Website Pages view. They see only the website section — no member data, events management, or billing screens are visible.
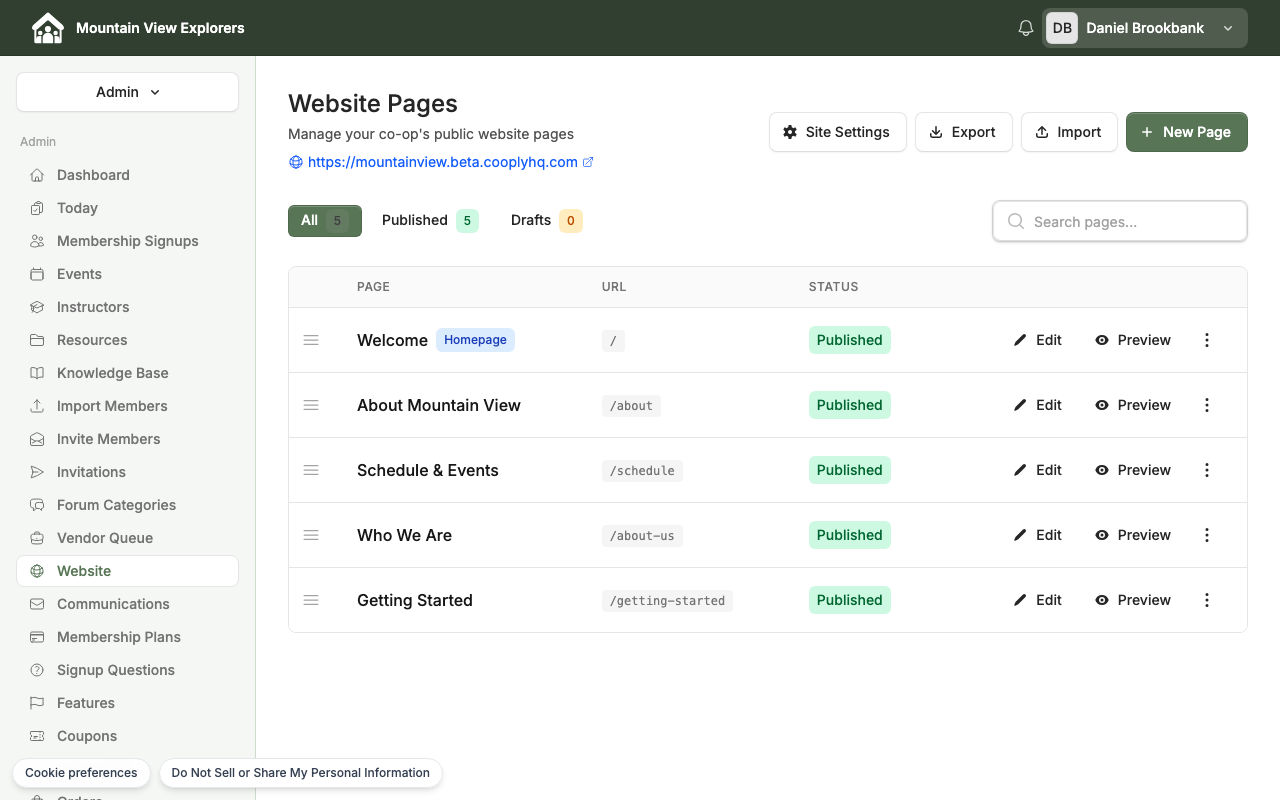
From here they can:
- Click Edit on any page to open the page editor
- Click Preview to see how a page looks on the public site
- Click New Page to add a new page to the website
How to revoke Content Editor access
To remove website editor access, go back to the member's profile (Members → Manage) and assign them a different role — typically Member for a standard co-op participant or Guardian if they are a family account holder.
Click Update Role to save the change. The member will no longer have access to the website editor the next time they log in.
What's next
- How to Configure Your Co-op Settings — manage co-op-wide preferences and branding
How to Export Co-op Finances (QuickBooks-compatible files)
What this export does
CooplyHQ lets you export your co-op's finances for your accountant in a format that can be imported into QuickBooks. The export is a .zip file containing four CSV reports:
- Accounts Receivable (AR) — outstanding balances owed to the co-op
- Invoices — all invoices issued during the period
- Payments — payments received from families
- Adjustments — any manual billing adjustments
This is a file export, not a QuickBooks integration or live sync. Your accountant imports the files manually into QuickBooks.
How to export your finances
Step 1 — Open QuickBooks Export
In the Admin panel, scroll down the left sidebar and click QuickBooks Export.
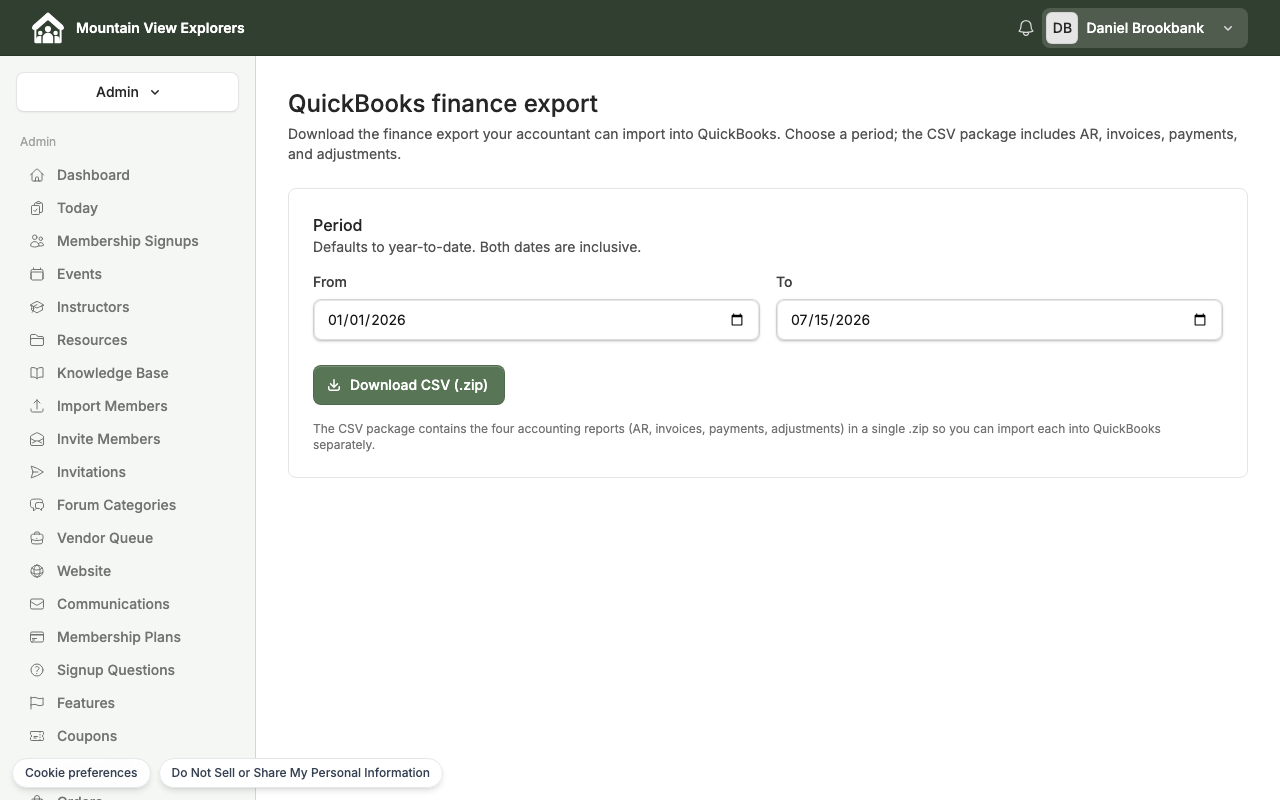
Step 2 — Set the date range
The export defaults to year-to-date (January 1 through today). Adjust the From and To dates if you need a different period. Both dates are inclusive.
Step 3 — Download the CSV package
Click Download CSV (.zip).
Your browser downloads a .zip file containing the four CSV reports. Send the .zip to your accountant — they can import each file into QuickBooks separately.
QuickBooks Desktop IIF export (optional)
If your co-op uses QuickBooks Desktop and needs an IIF file instead of CSV, this is available as an opt-in add-on. The IIF export button does not appear by default.
To enable it, contact CooplyHQ support. Once enabled, an Export IIF (QuickBooks Desktop) button will appear alongside the CSV button on the same page.
What's next
- How to View and Manage Membership Payments — track individual family balances and payment history
How Members Control Their Directory Privacy Settings
title: "How Members Control Their Directory Privacy Settings" bookstack_book: "Getting Started" description: "Choose which details your family shares in the member directory — hide or show your email, phone, address, and more, one field at a time."
What the family directory shows
The member directory lets co-op families connect with one another. Each family card can display:
- Household name — always shown, cannot be hidden
- Email address
- Phone number
- Home address
- Bio
- Profile photo
- Children info (number of children)
- Teaching skills and interests
You control which of these details appear on your family card. Your co-op administrator always sees your full information regardless of your privacy settings — privacy controls apply to other co-op members only.
How to open your privacy settings
Step 1 — Log in and go to My Profile
Log in to your co-op portal. In the left sidebar, click My Profile.
This opens the Edit Profile page where you manage both your personal profile and your directory visibility.
Step 2 — Scroll to Directory Visibility
Scroll down past the profile fields (name, bio, photo, teaching skills). The Directory Visibility section appears near the bottom of the page.
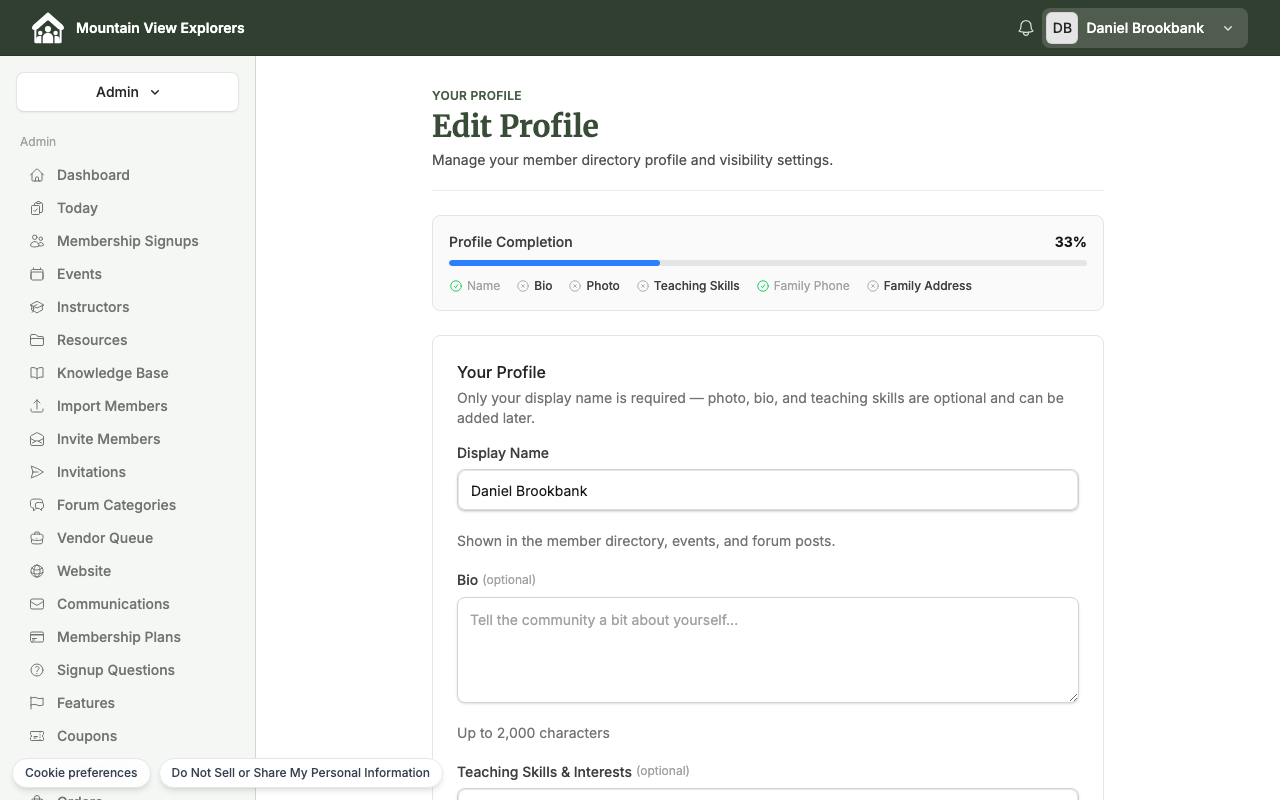
Note: Only the family's guardian account can change directory settings. If you don't see the Directory Visibility section, contact the guardian on your family account.
How to control what other members see
Show or hide your family entirely
The Show in Directory toggle at the top of the section controls whether your family appears in the directory at all.
- On (default) — your family card is visible to other members
- Off — your family does not appear in the directory
Turning off Show in Directory hides your entire entry. Other members will not see your family card.
Show or hide individual fields
When Show in Directory is on, a second panel shows individual field toggles. Turn each one on or off to control what other members see on your family card:
| Field | Default |
|---|---|
| Email address | Shown |
| Phone number | Shown |
| Home address | Hidden |
| Bio | Shown |
| Profile photo | Shown |
| Children info | Shown |
| Teaching skills | Shown |
Toggle any field off to hide it from other members. Your household name is always shown and cannot be hidden.
- Show All — turns on all optional fields at once
- Hide All — turns off all optional fields at once
Step 3 — Save your settings
Click Save Settings to apply your changes. A green "Saved!" confirmation appears briefly when your settings have been recorded.
What the directory looks like to other members
Other members see only the fields you have enabled. Fields you have hidden are simply absent from your card — there is no indication to others that you hid them.
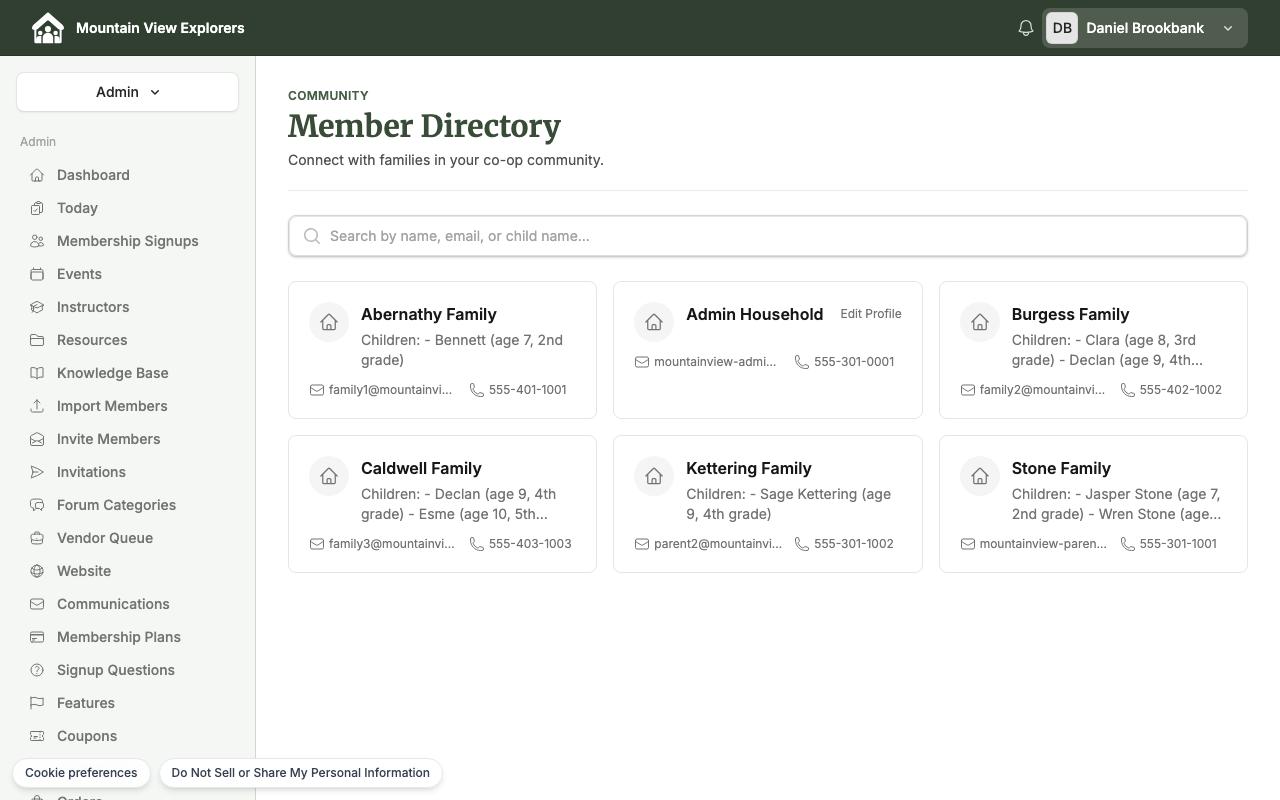
Co-op admins and staff always see your full information. Privacy settings do not restrict what admins can view.
How to confirm your changes took effect
After saving, visit the directory to see your card as other members see it:
If a field you turned off still appears, try refreshing the page and checking your settings again.
What's next
- How to Invite Families and Manage Your Member Directory — admin guide for the family directory
How to Manage Standing Volunteer Roles
Standing Volunteer Roles are recurring, year-long positions — like Treasurer, Newsletter Editor, or Field Trip Coordinator — that your co-op needs filled every year. Unlike one-off volunteer slots tied to a specific event, standing roles represent the ongoing structure of your co-op. Admins define the roles; members claim them from their dashboard.
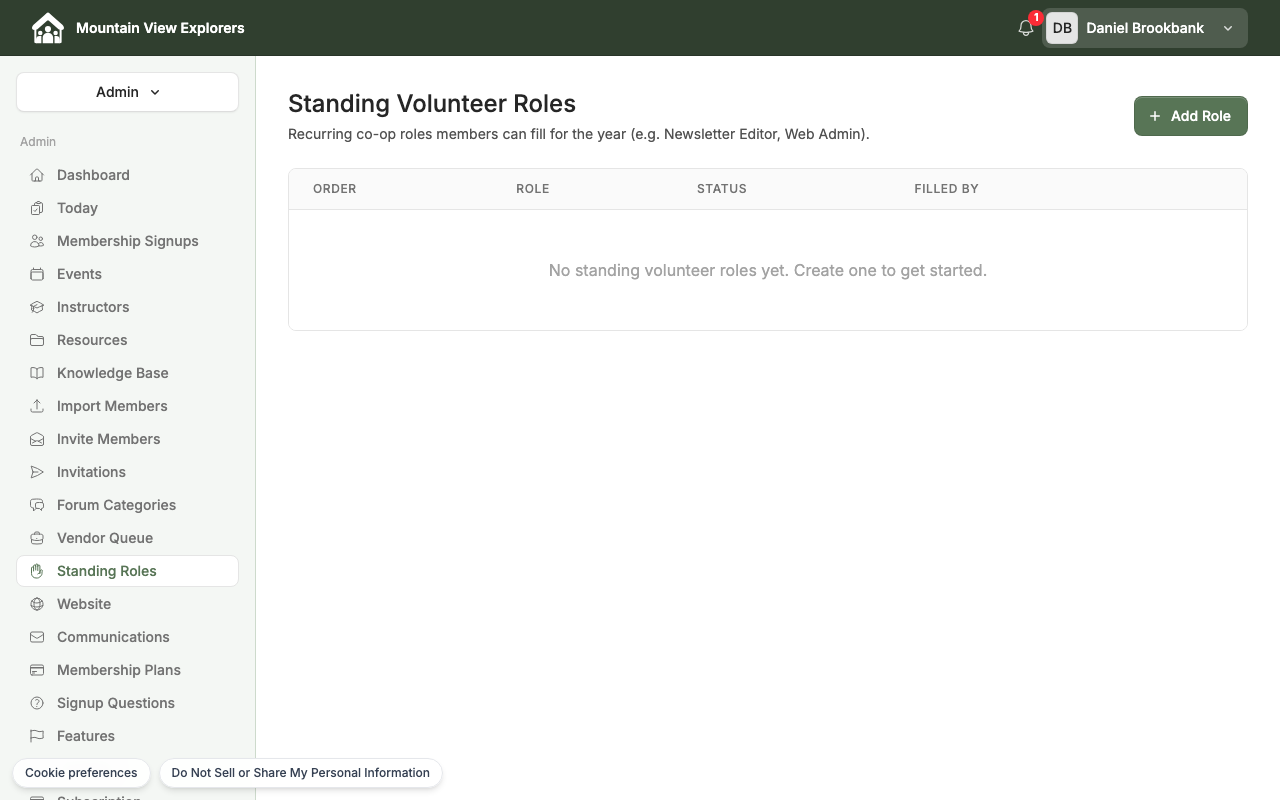
Create a Standing Role
Only co-op admins can define standing roles.
- In the admin portal, go to Community → Volunteer Roles.
- Click Add Role in the top-right corner.
- Fill in the role details:
- Name — the role title members will see (e.g., Field Trip Coordinator)
- Description — optional; a short summary of what the role involves
- Display Order — lower numbers appear first in the member list
- Active — leave checked to make the role visible and claimable by members
- Click Create Role.
The role appears in the table immediately. Its status shows Vacant until a member claims it.
To edit a role later, click Edit in the row. To remove a role permanently, click Delete — note that filled roles cannot be deleted until released.
How Members Claim a Role
Members see the Standing Volunteer Roles card on their dashboard.
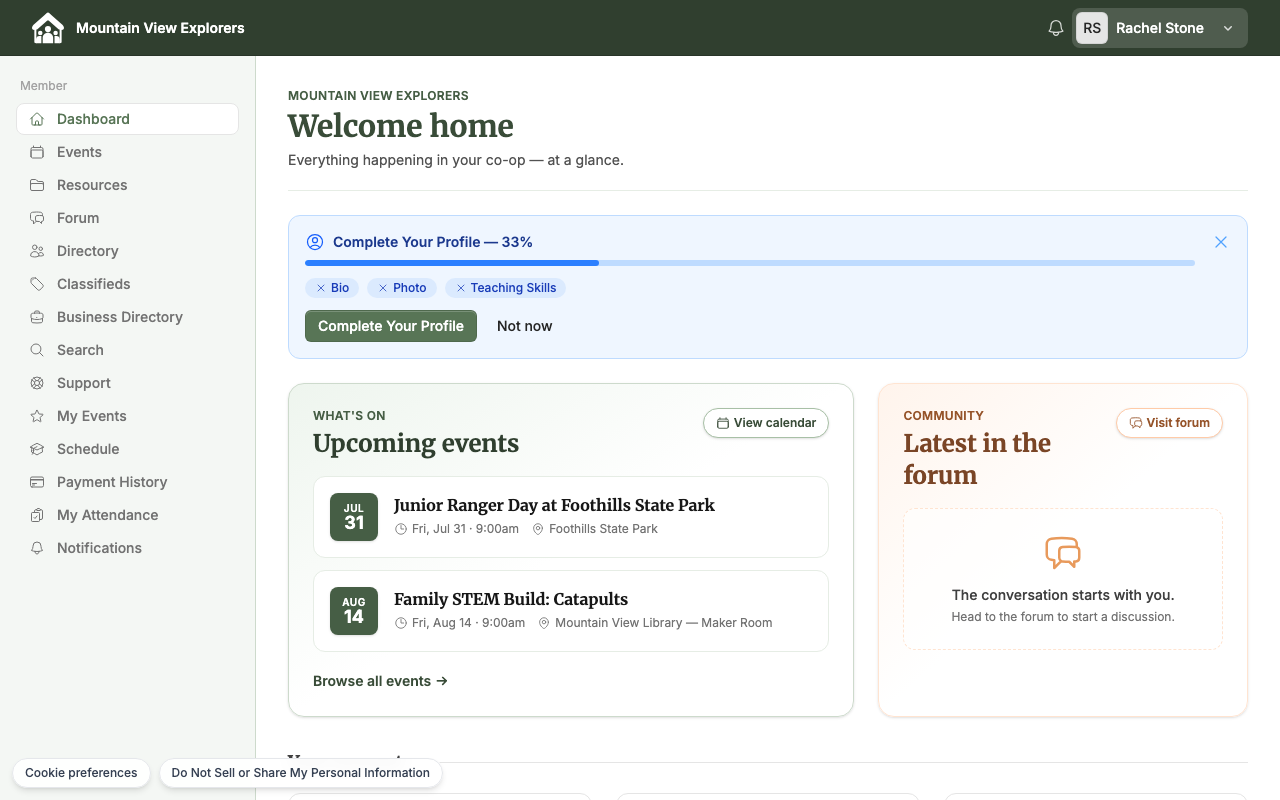
- From the member portal, go to the Dashboard.
- Find the Standing Volunteer Roles card.
- Browse the list of vacant roles. Each role shows its name and description.
- Click Claim next to the role you want to take on.
The card updates immediately to confirm the role and show the member as the current holder. A member can only hold one standing role at a time. If all roles are filled, the card says so and shows the option to suggest a new one.
To step down from a role, the member clicks Give up this role on their dashboard. The role returns to vacant and becomes available for another member to claim.
Suggest a New Role
If a member wants to volunteer in a way that isn't listed, they can suggest a new role:
- From the Standing Volunteer Roles card on the dashboard, scroll to the Suggest another role field at the bottom.
- Type a short description of the role (e.g., Carpool coordinator).
- Click Suggest.
CooplyHQ records the suggestion. To act on it, create the role manually in the admin portal using the steps above.
Release a Role at Year-End
At the start of a new co-op year — or any time a member steps down and you need to reassign a role — release it from the admin portal:
- Go to Community → Volunteer Roles.
- Find the filled role in the table. The Filled By column shows the current holder.
- Click Release next to their name.
- Confirm when prompted.
The role status changes back to Vacant. Members can now claim it again from their dashboards.
To reset all roles at the start of a new year, release each filled role one at a time.
What's next
- Review your co-op membership roster: How to Invite Families and Manage Your Member Directory
- Set up recurring membership dues: How to Set Up Membership Plans and Recurring Payments
What to Do If You Can't Sign In
Overview
If you're having trouble signing in to your co-op's website, here are the most common causes and how to fix each one.

The sign-in page won't let you continue
Sometimes the sign-in page shows a message saying it can't verify you're human, and won't let you go any further. This is usually caused by something in your browser, not by a problem with your account.
Try these steps in order:
- Go back to the sign-in page and try again.
- If it still won't let you through, try a different web browser (for example, switch from Safari to Chrome, or the other way around).
- Open a private or incognito browsing window and try again. On an iPhone or iPad, open a new private tab in Safari by tapping the tabs icon, then tapping Private.
- Turn off any ad blockers or content blockers for the website, then reload the page and try again.
If you're still stuck after trying all four, see Nothing worked? at the bottom of this page.
Your sign-in email never arrived
After you enter your email address, the site sends you a link to finish signing in. If that email doesn't show up:
- Check your spam or junk folder. Sign-in emails sometimes land there by mistake.
- Wait a full five minutes. These emails can take a few minutes to arrive.
- Make sure you typed the exact email address your co-op has on file for you. If you're not sure which address that is, ask your co-op's administrator.
Sign in with a password instead
If you'd rather not wait on an email, or the email path isn't working, you can sign in with a password instead:
- On the sign-in page, enter your email address in the Email field.
- Tap or click Continue with email.
- If you're prompted for a password, enter it and continue.
If you don't remember your password, look for a link to reset it on the same screen.
Nothing worked?
If you've tried everything above and still can't sign in, email support@cooplyhq.com. Include:
- The email address you're trying to sign in with
- Your co-op's name
- What device and browser you're using (for example, "iPad, Safari")
- What happens when you try to sign in, including any error message you see
Someone will follow up to help you get back in.
How to Add Your Co-op's Logo and Branding
Overview
Add your co-op's logo, favicon, and hero image so your public website looks like your co-op — not a generic template. These settings live on the Branding tab in Site Settings.
Step 1: Open the Branding tab

Step 2: Upload your logo
- Under Logo, click Choose File and select your co-op's logo image (JPG or PNG, up to 2MB).
Step 3: Choose what displays in the header
- Under Header display, choose what appears in your site header: your logo, your co-op name, or both.
- If you want a different header on small screens, set Header display (mobile) — otherwise leave it as Same as desktop.
Step 4: Upload a favicon
- Under Favicon, click Choose File and select the small icon that appears in browser tabs (ICO or PNG, up to 500KB).
Step 5: Upload a hero image
- Under Hero Image, click Choose File and select a default background image for your site (JPG, PNG, or WebP, up to 5MB).
Step 6: Save your changes
- Click Save Settings to apply your logo, header, favicon, and hero image changes.
Your new branding takes effect immediately on your public site.
Next steps
Now that your co-op's branding is in place, pick a site template and fine-tune your colors and fonts — see Site Templates & Themes.
How to Choose a Site Template and Customize Your Theme
Overview
Every co-op website starts from a professionally designed template you can make your own. Pick a template to set your overall look in one step, then fine-tune individual colors and fonts to match your co-op. These settings live on the Appearance tab in Site Settings.
Step 1: Open the Appearance tab
Step 2: Choose a site template
- Under Site Template, review the grid of template cards. Each card shows a preview of the design along with its color palette and number of included starter pages.
- Click Preview with my content on any card to see that template applied to your existing pages without saving anything.
- Click a template card, then confirm to apply it. You'll be asked whether to apply styling only, or styling plus a set of starter pages (added as drafts — they won't overwrite any pages you already have).
Applying a template updates your colors and fonts; it never overwrites existing page content.

Step 3: Fine-tune your colors
- Scroll down to Theme & Styling.
- Set your Primary, Secondary, and Accent colors using the color pickers or by entering a hex code directly.
- Check the Color Preview card to see how your colors look together on a sample header and button.

Step 4: Choose your fonts
- Under Heading Font and Body Font, choose the typefaces used for titles and paragraph text.
- Check the Font Preview card to see a sample heading and paragraph in your selected fonts.
Step 5: Save your changes
- Click Save Settings to apply your template, colors, and font choices.
Your updated theme takes effect immediately on your public site.
Next steps
Now that your site's look is set, add your co-op's logo and branding — see How to Add Your Co-op's Logo and Branding.
Website Editor: Editing Content & Publishing
Overview
CooplyHQ's website editor is a single visual canvas: the page you edit looks like the page your visitors will see. Every change you make is saved as a private draft automatically — your public site doesn't change until you press Publish. If you ever want an earlier version back, version history keeps every published version available to restore.
Step 1: Open a page in the editor

The canvas editor opens with your page rendered exactly as it appears live. Click directly on any text, photo, or button to edit it in place — there's nothing to preview separately, because you're always looking at the real page.

Step 2: Add and edit content sections
Your page is built from sections — an easy section-based website builder. Click + Add a section between any two existing blocks to insert a new one, then choose a type:
- Text — a rich-text block for paragraphs, headings, and lists
- Hero — a large banner with a headline, image, and call-to-action button
- Testimonials
- Photo gallery
- FAQ
- Stats band
- Card grid
- Location / Map
- Contact form
Click any section's text or image directly to edit it — changes appear on the canvas immediately. A newly added Text section starts empty; "Start writing..." is just placeholder guidance shown until you type, not text that gets published.
Step 3: Publish your changes
Edits save automatically as a private draft — you'll see a Saved indicator next to the page picker, and the Publish button shows a count of pages with pending changes. Nobody but signed-in admins can see draft changes.
To check what a draft looks like to a real visitor before publishing, click Preview unpublished changes in the toolbar. It opens your live site with your draft changes overlaid, with a banner reminding you visitors still see the current live version.

When you're ready to go live, click Publish in the toolbar. You'll see every page with pending changes listed — uncheck any you're not ready to publish yet — then confirm. Only the pages you check go live; everything else stays a draft.
Step 4: View or restore a previous version
Every time you publish, CooplyHQ keeps that version. To look back:
- In the editor toolbar, click More.
- Click Version history.
- Browse the list of past published versions. Restoring a version loads it back into your draft — it does not publish automatically, so you still review and click Publish to make it live.
Step 5: Undo and redo
While editing, use the undo and redo arrows at the top of the canvas (next to the page picker) to step backward or forward through your recent changes, the same way you would in a word processor.
Write or improve content with AI
Where your co-op has AI writing enabled, two entry points appear in the editor:
- Write with AI, under the More menu, drafts new content for you to review and edit.
- Improve with AI, in a Text section's toolbar, rewrites the text already in that section.
This entry point only appears when your co-op's AI writing feature is turned on — if you don't see it, your co-op doesn't have it configured yet.
Next steps
Now that you know how to edit and publish content, see How to Choose a Site Template and Customize Your Theme to set your site's overall look, or How to Add Your Co-op's Logo and Branding to finish your branding.
Website Editor: Creating & Organizing Pages
Overview
Every page on your public site is managed from the Website Pages list in your admin sidebar. From there you can add new pages, set how they nest under one another, control what shows when a page is shared on social media, and change the order pages appear in your site's navigation.
Step 1: Create a new page
Your new page opens directly in the canvas editor, ready to edit. It's created as an unpublished draft and left out of your site's menu until you choose to show it — nothing changes on your live site until you publish.
Step 2: Set a page's parent page
Pages can nest under one another — for example, an "Our Programs" page could hold "Elementary" and "Middle School" as subpages.
- With the page open in the canvas editor, click More, then Page settings.
- Under Parent page, choose the page this one should nest under, or leave it set to None (top-level).
- Click Save draft.
A subpage appears in a dropdown under its parent in your site's navigation, and lives at a web address like /parent-slug/page-slug.
A few things to know:
- Your site's homepage can't have a parent — there's no Parent page option for it.
- Once a page is published, its parent can't be changed, because that would change the page's web address. Set the parent before you publish for the first time.
- A page that already has subpages of its own must stay top-level; it can't be made a subpage of something else.
Step 3: Set a page's share image
- With the page open in the canvas editor, click More, then Page settings.
- Under Share image, click to upload a photo.
- Click Save draft.
Only image files are accepted here — uploading anything else shows an error and the upload doesn't go through.
Step 4: Reorder pages in your page list
On the Website Pages list, grab the handle next to a page and move it up or down to change where it falls in your site's navigation. Your public menu updates to match as soon as the new order is saved.
Step 5: Manage a page's content with the keyboard alone
Building out a page's content doesn't require a mouse:
- Tab to reach a section's action bar — Settings, move up, move down, Duplicate, Hide, and Del are all operable by keyboard.
- Add a section from the + palette; your typing cursor lands right inside the new section.
- Use the move up / move down controls to reorder a section.
- Use Del to remove a section.
- Reach Publish the same way, through the toolbar or the More menu.
A page can be built, reorganized, and published start to finish without touching a mouse or trackpad.
Next steps
Now that you know how to create and organize pages, see Website Editor: Editing Content & Publishing to learn how to edit a page's content and publish your changes.